Finding the Radio S/N for Chrysler
The first step is to locate the radio's serial num.
Depending on the radio unit fitted in your 2018 Voyager, the S/N can usually be accessed either through the screen menu or by pulling the unit out and checking the label on the radio itself.
Below are the most common methods to identify your serial the right way.
Factory Radios on the 2018 Chrysler Voyager
The 2018 export Voyager - sold in Canada and select markets on the same RT minivan platform as the North American Town & Country / Dodge Grand Caravan - kept the same legacy Mopar lineup with no hardware changes. No Uconnect 8.4 RA3/RA4 ever arrived on this minivan. The base RES (Media Center 130) AM/FM/CD radio is non-touchscreen with a small one-line display, hard preset buttons and rotary knobs - no NAV button, no factory Bluetooth out of the box on most builds. The volume option RBZ (430 MyGIG) has a 6.5-inch color touchscreen with a glossy black bezel and hard keys for Radio, Media, Controls, More and Phone flanking the screen, with no NAV soft key because it has no navigation. The top-tier RHB (430N MyGIG) uses the same 6.5-inch screen and bezel as the RBZ; tell it apart by the NAV soft key on the home menu, the Garmin boot logo and the 28GB internal hard drive. The optional rear-seat DVD entertainment system - a 9-inch flip-down overhead screen with separate DVD player in the lower dash and wireless headphones - was independent of the head unit and orderable with any of the three radios.
Access Your Serial on the Radio Display
The method for 2018 Chrysler Voyager is this:
The 2018 Chrysler Voyager — the entry-level Chrysler minivan — is fitted with the Uconnect 8.4" Classic (RA3). Despite being the lower-trim minivan, the RA3 Dealer Mode is available.
Press and hold Climate Up, Climate Down, and Front Defrost simultaneously for 5 seconds with ignition in ACC or ON. Dealer Mode opens. Navigate to: System Info → Radio Part Info → Serial Number.
Releasing the Unit to Access the S/N on the Tag
If the serial does not appear on display, the next step is checking the radio itself.
Many Chrysler radios require physical access to the ID label attached to the unit.
Common approach:
- Start by completely shutting off the engine - pull the key out.
- Then remove the dashboard bezel.
- Next, loosen the mounting points and pull the radio forward.
- Look for a barcode label showing the serial number.
If Dealer Mode is unavailable on the 2018 Chrysler Voyager, remove the RA3 from the Voyager's practical center stack.
- Pry off the bezel panel with a plastic trim tool.
- Remove the 4 Phillips mounting screws.
- Pull the unit forward to access the serial label on the top or side of the radio chassis.
View Serial by Pulling Out the Radio Unit
The factory head units offered on the 2018 Voyager - typically the RES single-CD radio, the RBZ MyGIG 430 (6.5-inch touchscreen), the RHB MyGIG 430N (6.5-inch touchscreen with navigation), and the optional REZ rear-seat DVD entertainment module - all keep their serial on a printed chassis label. These legacy radios do not expose the serial through the screen, so the head unit has to come out for the sticker to be read.
- Safety first: turn the ignition off, remove the key, disconnect the negative battery terminal, and wait several minutes before touching wiring; avoid the yellow airbag/SRS connectors entirely and use plastic trim tools so nothing shorts or breaks.
- Tools you will need: plastic trim removal kit, Phillips screwdriver, small Torx bit set, flashlight, and a 7 mm socket on hand for any deeper retaining bolts.
- Ease the centre stack bezel forward at the lower edge using a plastic pry tool and work up the sides - on this body it is held in by four friction clips with no visible screws on the bezel itself.
- With the four clips released, lay the bezel on a soft cloth (it does not need to be unplugged from any harness to do the job).
- Remove the four screws securing the radio chassis to the dash bracket.
- Slide the radio forward and disconnect the antenna lead and the multi-pin power/data harnesses at the rear.
- The serial number is printed on a barcode/sticker label on the top or side of the radio chassis next to the part number and supplier markings; the REZ rear-seat DVD module wears the same kind of printed label on its own case.
- Photograph the label up close in good light and double-check ambiguous characters such as 0/O and 1/I before submitting the serial.
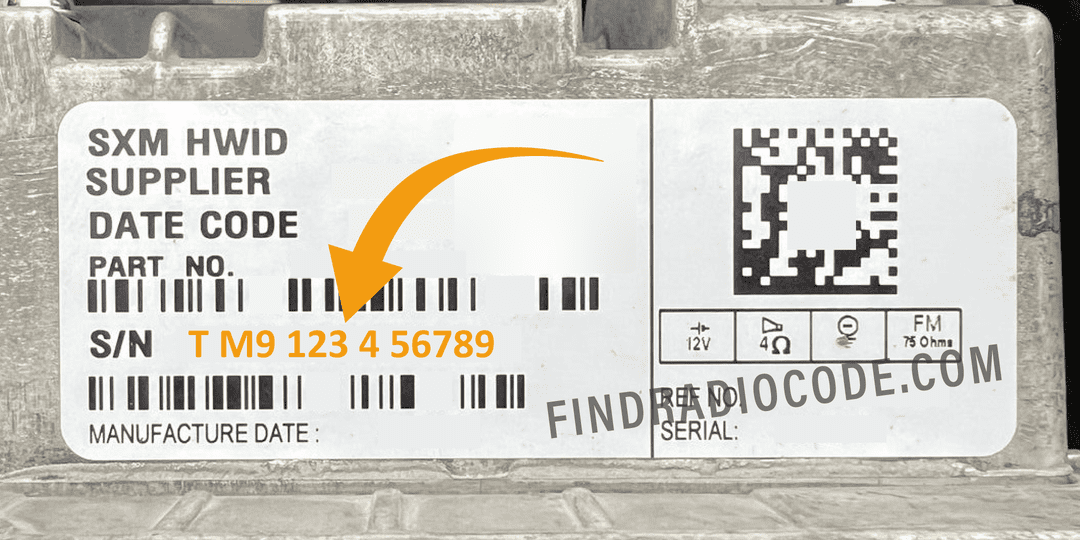
Example: Chrysler Voyager serial number label location
What a Valid Serial Number Looks Like
Year Chrysler Voyager RA3 serial formats:
T00AM– Harman VP2 RA3 (most common on Voyager)T00BE– Continental versionTM9– Older Harman production
Serial is 14 alphanumeric characters. Ignore the part number (starts with P05064 or 68).
What a Valid Serial Number Looks Like
The factory radios fitted to the 2018 Voyager are legacy Mopar head units rather than the later Uconnect 8.4 platform, so the prefix on the chassis label varies with which radio was specified and which supplier built it.
RBZ MyGIG 430 and RHB MyGIG 430N
- These Mitsubishi-built MyGIG units typically print an alphanumeric serial on the case sticker.
- Common Mopar/MyGIG prefixes from this generation include
TM9alongside otherT-style codes. - The serial usually runs as a continuous block of letters and digits with no dashes or spaces.
RES (single-CD)
- The base RES head unit usually carries a Mopar-style serial on a chassis sticker.
- Treat the printed label on the unit itself as the authoritative reference and copy each character exactly.
REZ rear-seat DVD module
- The optional REZ overhead DVD entertainment unit also wears a printed chassis label with its own serial.
- If codes are needed for that module, transcribe its serial separately and avoid guessing unclear characters.
Steps to Unlock Your 2018 Chrysler Voyager Radio
Vehicle radios use security codes tied to the radio unit itself instead of the vehicle model or production year.
- The generator identifies your Chrysler radio via serial-based verification.
- When you input the serial into the generator, the system identifies the radio unit and retrieves the corresponding code.
- Simply input the digits into the Voyager stereo.
- Compared to Chrysler dealer retrieval, this method is faster and more convenient.
Entering the Radio Security Code
When you obtain the correct unlock code based on the S/N, you can restore normal functionality by entering it into the unit.
The code entry process depends on the head unit design, but most 2018 Voyager systems follow a similar structure using preset buttons, touch controls, or rotary knobs - depending on if it's a factory or an aftermarket unit.
You will typically see SAFE displayed on screen.
Entering Process
To enter the code on the 2018 Chrysler Voyager Uconnect 8.4":
- Turn ignition to ON. Screen displays "ENTER CODE".
- Enter each digit of your 4-digit code on the on-screen keypad.
- Radio auto-confirms after the 4th digit. No confirm button needed.
3 wrong entries cause a 60-minute lockout. Keep ignition ON. Turning off restarts the timer.
In-depth Entering Instructions for Voyager 2018
Once the unlock code has been retrieved for a 2018 Voyager radio, it can be entered straight at the head unit - no scan tool or dealer visit is required.
- Limited attempts: Mopar head units only accept a small number of incorrect tries (commonly three) before going into a long lockout/WAIT state, so verify each digit before pressing it.
- Place the ignition in RUN/ACC so the radio powers up but the engine stays off.
- Wait for the display to show
CODE,Enter Anti-Theft Code, or a similar prompt. - On the RBZ/RHB MyGIG (6.5-inch) units, type the digits using the on-screen number pad and confirm with the on-screen OK/Enter button. On the base RES head unit, press the numbered preset buttons (1-6) in sequence and confirm with the tune/menu knob or labelled enter button as prompted on the display.
- If
WAITor a similar timeout appears after the failed-attempt limit is reached, leave the radio powered with the ignition in RUN for a continuous 30 minutes before trying the correct code again.
What Caused the Radio to Lock?
The 2018 Chrysler Voyager radio self-locks whenever the battery is disconnected. The lock applies to all Uconnect Chrysler minivans.
Most common cause: battery replacement or disconnect. Other causes:
- Failed radio fuse
- Buying the Voyager second-hand without a code
- Battery disconnect for repairs
- Battery dead from sitting unused
Code comes from the radio serial number — not the VIN.
Voyager 2018 Common Radio Problems
On the Voyager RA3 label: serial = 14 alphanumeric chars, starts with T00AM, T00BE, or TM9. Part number starts with P05064 or 68 — not the serial.
The Voyager RA3 label shows both serial and part number. Serial: 14 chars, starts with T00AM, T00BE, or TM9. Part number (skip): starts with P05064 or 68.
Re-check each character. Contact support for a free re-check if needed.
3 wrong entries lock the Voyager RA3 for 60 minutes. Keep ignition in ON or ACC. Turning off restarts the timer.
The Voyager Uconnect RA3 uses touchscreen-only code entry. Tap each digit on the on-screen keypad. Confirms after the 4th digit. No physical buttons needed.
If no code prompt appears, the lock hasn't activated. Trigger it by briefly pulling the radio fuse, then reconnect and turn ignition to ON.