
What Caused the Radio to Lock?
Honda's older radios include a built-in anti-theft system that engages whenever the radio is cut off from its power supply. Common reasons include:
- Battery replacement — the most common cause; disconnecting the battery wipes the radio's memory.
- Dead battery — an exhausted battery also triggers the lock as a disconnected one.
- Electrical repair work — repairs that requires disconnecting power will activate the lock.
This security feature was designed to deter theft by making the radio useless after removal. Once you input the correct code, the radio stays unlocked until the next battery disconnect.
Understanding the 2002 Honda Civic Radio Code Retrieval Process
Getting your radio code takes only a few easy steps.
- Locate your radio's serial - this is the only info required by our side.
The difference with the dealership lookup is that no VIN is needed. - When you've found the S/N, type it into the form above.
The system checks it against a database of supported factory radios and automatically retrieves the matching security code. - In most cases, the code appears instantly on the screen after payment and is also sent to your email , just in case.
If we need to check it manually, you'll be notified before checkout. - When you receive it, just enter it into the radio to restore the functionality.
Entering Your Unlock Code
Now that you've generated 2002 Honda Civic radio code from the serial, you're ready to reactivate the radio.
Some drivers hesitate at this stage because input process can look different across radio versions, but it's usually simple.
When the radio shows ENTER CODE, it means the unit is waiting for the correct numbers.
In-depth Input Instructions for Civic 2002
To input the unlock code on the 2002 Honda Civic:
- Turn ignition to ON. The radio shows "CODE".
- Use preset buttons 1 through 5 to enter your 5-digit code:
- Press button 1 multiple times until the 1st digit appears
- Press button 2 for the 2nd digit, and so on
- Hold preset button 6 for a few seconds to confirm.
Lockout: After three incorrect attempts, the radio locks out. Leave the ignition ON for 60 minutes, then retry. Don't turn the key off or the timer resets.
Entering the 5-Digit Code on the 2002 Civic
Once you have the correct 5-digit anti-theft code for your 2002 Civic radio, the entry process is fast, but you have a strict attempt limit before the radio locks itself out, so verify the code before you start.
Limited Attempt Warning
You only get around 10 attempts. After roughly ten consecutive wrong codes, the factory Honda radio of this era enters a lockout state and the display shows Err or E. Many units can be cleared by leaving the ignition in the ACC/ON position for one continuous hour and then trying the correct code; others must be reset by a Honda dealer. Cycling the key off does not always shortcut the timer, so do not hammer guesses at the unit.
Entering the code
- Turn the ignition to the ACC or ON position so the radio powers up and shows the CODE prompt.
- First digit: press the preset button numbered the same as that digit - a single press.
- Second digit: one press on its matching preset.
- Third digit: one press on its matching preset.
- Fourth digit: one press on its matching preset.
- Fifth digit: one press on its matching preset. If a digit repeats, press the same preset again (code 33512 = 3, 3, 5, 1, 2).
- If the radio does not accept the code automatically after the fifth digit, press SCAN, TUNE or the power button to confirm the entry.
If it does not unlock
- Stop after the second wrong attempt and re-verify the serial number you used to obtain the code.
- Make sure no leading letter or trailing digit was dropped from the serial.
- If
Errappears on screen, leave the ignition in ACC/ON for the full one-hour cooldown before trying again. - Avoid further guesses if the lockout returns - at that point the radio likely needs a Honda dealer reset or Honda's online radio code lookup with VIN.
Where to Find the Serial Number on your Civic
The useful fact to know is that factory radios use a specific S/N to identify each unitindividually.
Your security system links the code directly to the serial.
Different from vehicle-specific data like VIN or registration info, it is not determined by the model or production year, so you'll be able to get it even if you have an aftermarket radio.
Depending on the maker and radio installed in your Honda Civic, the retrieval method varies.
These are the most reliable ways to find it.
Identify Your 2002 Civic's Factory Radio
The 2002 Civic is a carry-over year for the 7th-generation ES/EM2 platform launched in 2001. The factory single-DIN head-unit family is unchanged, with Honda continuing to source audio from Alpine, Clarion and Panasonic.
Factory head units for 2002
- AM/FM cassette receiver - the entry-level radio on the DX trim, with a single tape mechanism and manual tuning.
- AM/FM cassette + single-disc CD - common on the LX trim, combining a tape slot and CD slot in a single-DIN chassis.
- AM/FM single-disc CD player - standard on the EX trim, with Honda part numbers in the
39100-S5A-.family supplied by Alpine or Clarion.
Quick visual ID
- Tape slot only on the front fascia - that is the cassette base radio.
- Tape slot plus a separate CD slot - that is the cassette/CD combo.
- CD slot only with no tape mechanism - that is the EX-grade single-CD radio.
All three units carry the Honda anti-theft system and will display CODE or Err after a battery disconnect, requiring the original 5-digit code to come back online.
Fast Serial Lookup Using Radio Controls
These are the steps you should follow for 2002 Honda Civic:
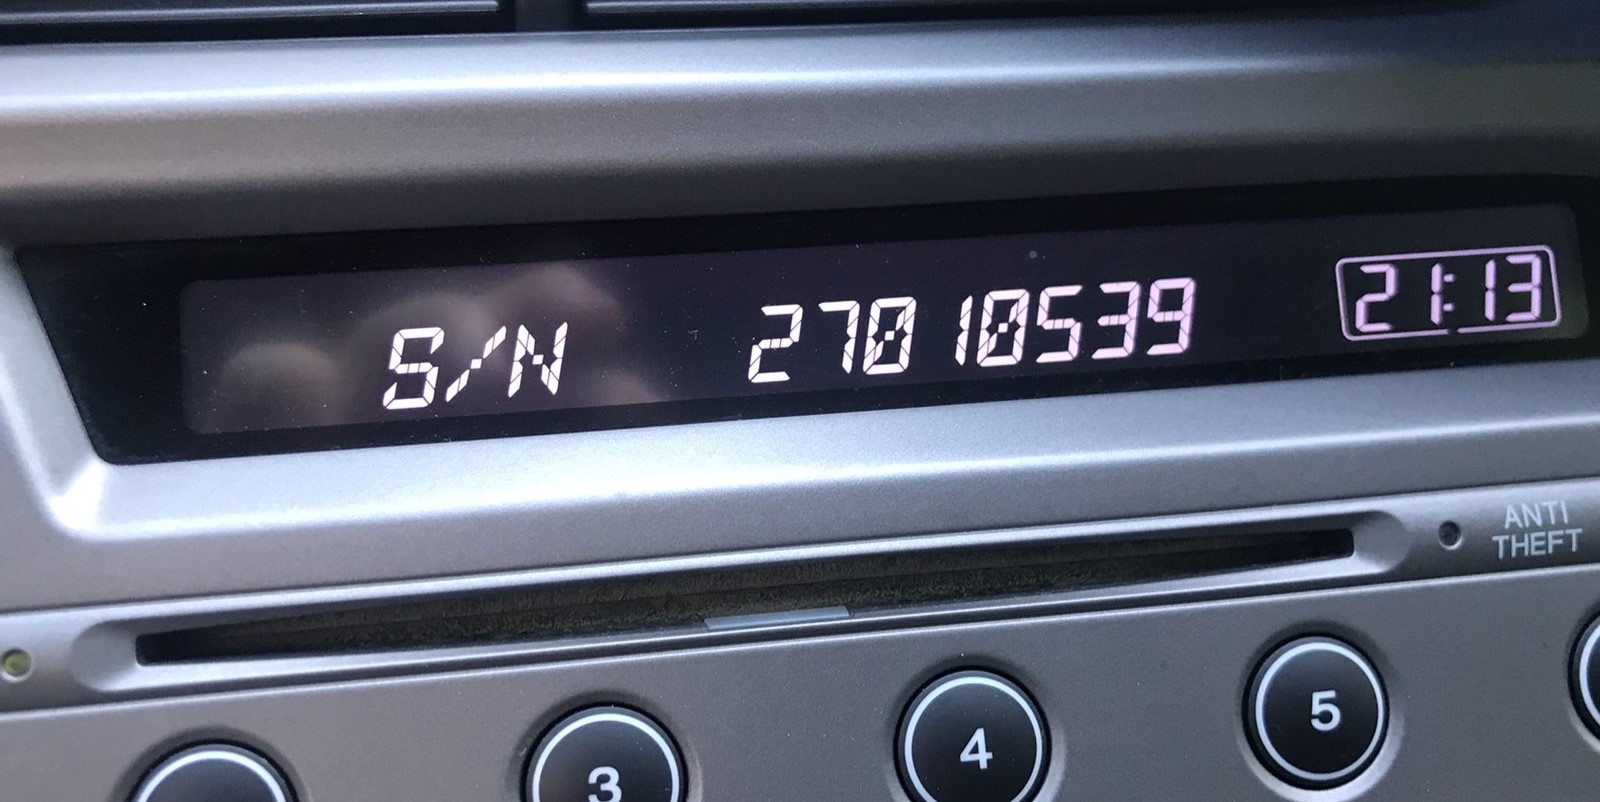
The 2002 Honda Civic comes with a single-DIN CD radio made by Alpine or Panasonic for Honda. You can display the serial number without removing the radio:
- Turn the ignition to ON (or ACC). The radio displays "CODE" if locked.
- Hold down preset buttons 1 and 6 together for about 5 seconds.
- The screen will reveal a 10-character serial number in two parts (e.g.,
U3210thenL0482).
Note: Write down both parts carefully – the full serial is both codes combined, for example U3210L0482. Certain 2002 Civic radios may require you to press 1+6 a second time to reveal the second half.
Pulling Out the Radio to Access the S/N on the Tag
If the serial does not appear on display, the next step is checking the radio itself.
Many Honda radios require physical access to the ID label attached to the unit.
Common approach:
- Start by completely turning off the engine - pull the key out.
- Then remove the radio surround.
- Next, loosen the mounting points and slide the radio forward.
- Look for a factory sticker showing the serial number.
If the button method doesn't work on your 2002 Honda Civic, you can take out the radio to find the serial label:
- Power down the vehicle and take the key out.
- Detach the center console trim using a plastic pry tool. Honda bezels are usually secured with snap clips.
- Unscrew the 4 Phillips-head screws fastening the radio in place.
- Slide the radio forward and locate the silver sticker with the serial number on the back of the radio casing.
Note: Older Honda radios are relatively light. The single-DIN unit comes out easily once the screws are removed.
Pull the Radio Out to Read the Chassis Label
If the dash sticker, owner's wallet card and glove box label are not available, the most dependable way to read the serial number on a 2002 Civic is to remove the head unit and copy it directly from the chassis label. The ES/EM2 dash bezel is held by retaining clips with a small number of screws, so the work is mechanically straightforward but worth doing with care because of the SRS airbag wiring nearby.
Safety first
- Turn the ignition fully off and remove the key from the cylinder.
- Disconnect the negative terminal of the 12V battery.
- Wait at least three minutes before working near the dash so the SRS capacitor can fully discharge.
- Avoid touching or tugging on any yellow airbag connectors while the trim is loose.
Tools you will need
- Phillips screwdriver for the bezel and radio retaining screws.
- Plastic trim/panel pry tool to release the dash clips without scratching the surface.
- A phone or camera for a clear photo of the chassis label.
Removal overview
- Gently pry off the centre dash bezel around the radio and HVAC controls - it is held by retaining clips around its perimeter.
- Walk the pry tool around each clip until the bezel comes free, then disconnect any wiring (hazard switch, etc.) before setting it aside.
- Remove the visible Phillips screws securing the radio to the dash frame (typically two or three on this generation).
- Slide the head unit forward and unplug the wiring harness and antenna lead from the rear of the unit.
Where the serial is printed
- Look on the top, side or rear face of the metal chassis for a white or silver thermal-printed label.
- The label carries a Honda part number (for example
39100-S5A-..) and a separate serial number. - Copy the longest alphanumeric string next to the barcode - that is the serial line.
Tips
- Photograph the label rather than copying by hand to avoid misreading characters such as O vs 0 or I vs 1.
- Reassembly is the reverse of removal: connectors back on, screws home, bezel pressed in until each clip seats, then reconnect the battery and enter the radio code to bring the unit back online.
Example: Honda Civic serial number label location
Typical Serial Number Formats for 2002 Civic Radios
The 2002 Honda Civic radio serial number has the standard Honda OEM format:
U1234L5678– The typical Honda factory format – two halves displayed separately (U####thenL####), combined into a 10-character serial
The radio in the 2002 Civic is a single-DIN CD player manufactured by Alpine or Panasonic under Honda's OEM contract.
Important The serial is 10 characters (U + 4 digits + L + 4 digits). Don't confuse it with the part number (usually starts with 39100, 39101, etc.).
Common Serial Number Formats on 2002 Civic Radios
Factory 2002 Civic head units carry a printed serial number on the chassis label rather than a moulded-in code. Owners and unlock services most often report a short alphanumeric string with a single letter prefix on these units.
What the serial typically looks like
- The serial is usually an alphanumeric string of around 8 characters next to the barcode on the chassis label.
- Common Honda audio prefixes seen on Civic units include
U(often reported on Alpine-supplied Civic radios) andM, with the rest of the string made up of digits and letters. - The label also lists a Honda part number such as
39100-S5A-..- this is not the serial and should not be entered into a code lookup tool.
What to copy from the label
- Take the longest alphanumeric string next to the barcode - that is the serial line, not the part number.
- Double-check ambiguous characters such as O vs 0 and I vs 1 by comparing the printed string with the barcode.
If the string you read does not match the patterns above, confirm that you copied the serial line rather than the Honda part number, which sits separately on the same label.
Understanding Unlock Issues with Your Civic
When the radio enters a lockout state after 3 wrong attempts, leave the ignition turned ON and stay for one full hour. Do not turn the key to ACC or OFF during this period — doing so resets the timer from zero.
Once the hour has passed, the radio should exit the lockout and show "CODE" again. Then you can re-enter the correct code. If the radio shows "ERR" or remains locked after waiting, contact support — some older Honda units require a dealer service visit in extreme cases.
A frequent reason a code is rejected is using a code generated from the wrong serial number. On older Honda radios, the label on the radio chassis carries both: the serial number (e.g., U1234L5678) and the part number (e.g., 39100-SCV-...). Make sure you submitted the serial, not the part number.
Double-check that you read the full 10-character serial correctly — the letter O and the digit zero look almost identical on these older labels. Contact support for a free reverification if the code was rejected.
When the radio powers on but skips the "CODE" prompt, a few things could be happening:
- The radio may not be locked — attempt using it normally first.
- Some older Honda radios show "CODE E" instead of simply "CODE" — this also means the same thing and code entry works the same way.
- It could be in an error state from a previous lockout — leave ignition ON for one hour, then recheck.
Should the display shows nothing, verify that the radio has power — the ignition fuse may have failed during the battery disconnect that triggered the code request.
On older Honda single-DIN radios, code entry uses the 6 preset buttons along the bottom of the faceplate:
- Buttons 1 through 5 — use each to enter one digit of the five-digit code. Press a button repeatedly scrolls through digits 0–9.
- Button 6 — press and hold this button for 2–3 seconds to confirm the entered code.
Some early Honda models use a slightly different layout where buttons are labeled 1–4 plus SCAN and RPT — in that case, use SCAN or RPT to confirm instead of button 6. Check your owner's manual if unsure which button confirms.
The serial number and the part number are printed on the same label on the unit chassis. It's a common mistake:
- Serial number: usually starts with
Ufollowed by digits, thenLand more digits — for exampleU1234L5678. This is the correct value to submit. - Part number: begins with
39100or39101— do not use this as the serial.
Should the label is worn, use the 1+6 preset button method to display the serial on the radio screen as an alternative. See the serial display section above for step-by-step instructions.