
Why Is the Radio Asking for a Code?
Mid-era Honda radios retain the same anti-theft logic as earlier models: any interruption in battery power activates the code prompt on the next startup. Frequent reasons include:
- Battery replacement or disconnect — by far the most common cause.
- Battery drain — a fully dead battery has the same effect.
- Fuse replacement — swapping the radio fuse can momentarily cut power and activate the lock.
- Workshop electrical work — repairs that involves disconnecting the battery will produce this.
Entering the correct code removes the lock and normal function is restored immediately. The lock only comes back if power is cut once more.
How to Unlock a Honda Civic Radio After Power Loss
- Skip long troubleshooting discussions or service visits - you can retrieve the code online with the radio serial number.
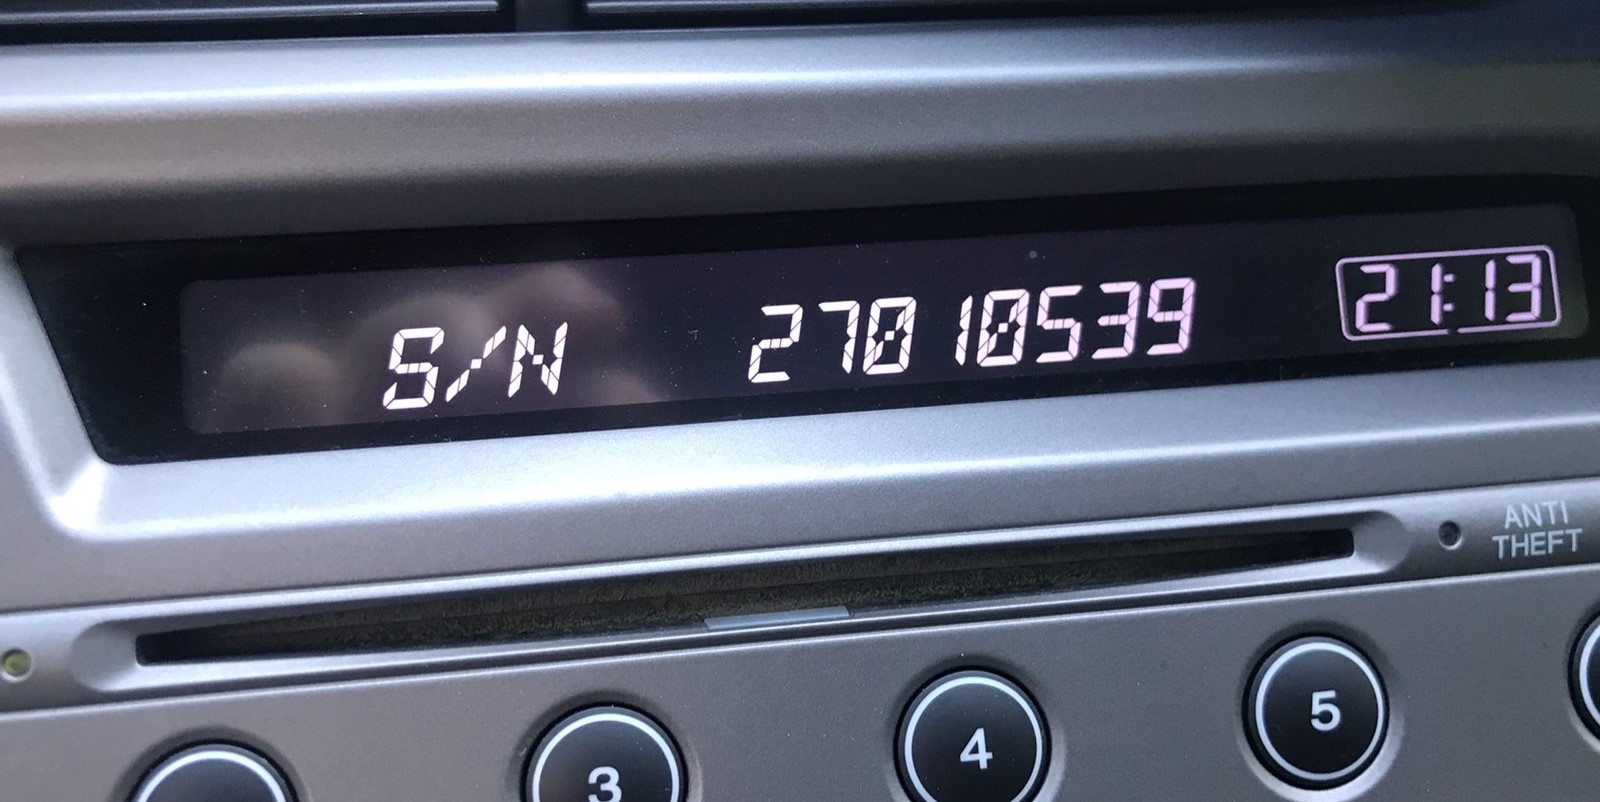
- Start by finding your radio's serial. You will always find it on the unit itself, and in some cases it can be visible on the Civic's display.
- Type it into the form above, and our software will retrieve the correct 2010 Civic unlock code.
- When you receive the code, type it in using Civic's radio controls to release the blockade fully.
- The entire process takes just a short moment and requires minimal effort.
Entering the Radio Security Code
Now that you've generated 2010 Honda Civic radio code from the serial, you're ready to reactivate the radio.
Some drivers get stuck at this stage because input methods can look different across radio versions, but it's usually quick.
When the radio shows ENTER CODE, it means the unit is waiting for the correct numbers.
The Correct Way to Enter It
To type in the code on the 2010 Honda Civic's radio:
- Ignition ON. Radio displays "CODE".
- Press preset buttons 1-5 to enter each digit of the 5-digit unlock code. Each button cycles through digits 0-9.
- Hold button 6 for 2-3 seconds to confirm.
Lockout: Three failed attempts = 60-minute lockout. Keep ignition ON for the full hour. Turning off the ignition restarts the lockout timer.
Detailed Input Instructions for the 2010 Civic
Once you have the correct 5-digit anti-theft code for your 2010 Civic's radio, entering it is straightforward on every 8th-gen variant - LX, LX-S, DX-G (Canada), EX, EX-L, Si, and Hybrid - because they share the same code-entry interface. The unit only allows a limited number of tries before locking, so verify the code before you start.
Limited Attempt Warning (read first). Honda Civic head units of this era allow up to 10 attempts to enter a valid 5-digit code. After 10 successive invalid entries the radio drops into a 1-hour cooldown - the display generally shows CODE with a wait indicator, and the recovery is to leave the ignition in RUN (II) with the radio powered for a continuous 1 hour. Power-cycling during the wait restarts the timer, so leave the unit on. (On certain builds the unit instead permanently locks after 10 strikes and requires a dealer / professional reset, so do not gamble guesses on attempt 9 or 10.)
Step 1 - Power up. Turn the ignition to ACC (II) and wait for the head unit to finish booting until the display reads CODE or Enter Code. If a wait indicator is showing instead, sit through the cooldown before doing anything else.
Step 2 - Enter each digit with presets 1-6. The presets are the digit keys: a 4 in the code is one press of preset 4, a 1 is one press of preset 1, and so on through all five digits in order (code 41526 = 4, 1, 5, 2, 6). The display fills in each digit as you press.
Step 3 - Mind sticky presets. A worn preset may not register a light tap; press each one firmly and check that a new digit appears on the display every time.
Step 4 - Automatic acceptance. A correct code is accepted the moment the fifth digit goes in, with no enter or OK press required. A correct code clears the prompt; an incorrect code redraws CODE and decrements the remaining-attempts counter.
If the code is rejected. Stop after the second failed attempt, re-verify the digits against your paperwork and any glove-box owner's card, and double-check the serial you used to look up the code. Restart cleanly from the first digit on the next try - never burn a retry on a guess.
Tip. Take the presses slowly; a double-tap registers as two digits. Should one go wrong, complete the five-digit entry, then start the correct code again from the first digit.
Locate the Serial Number Needed to Generate Honda Civic 2010 Radio Code
The starting step is locating the radio S/N.
Many drivers assume the code depends on the Honda model or year, but in reality, the unlock process depends on the unique radio's serial number.
This number identifies the exact head unit installed in your Honda Civic.
This is even better, because if you have bought a used radio, the VIN or other vehicle-specific data wouldn't be of much use.
Depending on the radio version used, you may be able to retrieve the serial directly from the screen or by checking the label on the radio chassis.
Which Head Unit Is in Your 2010 Civic?
The 2010 model year carried the post-refresh 8th-generation Civic catalogue forward unchanged on the audio side: same dual-tier dash, same head-unit family by trim, same 5-digit anti-theft code, same U/L dealer-mode split. Identifying which unit is in your dash determines where the chassis label sits and how the unlock prompt looks on screen.
DX (US, no factory audio). The US 2010 Civic DX sedan and coupe again shipped without a factory head unit and with speakers/antenna pre-wired only. A DX with a radio installed typically has a dealer- or owner-fitted unit and is not bound by the Honda anti-theft code system. The Canadian DX/DX-G is the exception and shipped with the same 160 W single-CD MP3/WMA unit as the LX.
DX-G / LX / LX-S 160 W AM/FM/CD with MP3/WMA and AUX. The mainstream 2010 head unit on the LX sedan, LX coupe, LX-S sedan, and Canadian DX-G. Single-CD slot reading CD-R/CD-RW with MP3/WMA, monochrome amber two-line display, presets 1-6, dual rotary knobs, 4 speakers at 160 W, and a front-panel 3.5 mm AUX jack on most builds.
EX 160 W (sedan) / 350 W premium (coupe) AM/FM/6-disc CD/MP3/WMA, optional XM. EX trims fit the in-dash 6-disc CD changer with MP3/WMA support, XM-ready chassis, and the same monochrome two-line display family. The EX coupe runs the 350 W 7-speaker premium amplifier with subwoofer; the EX sedan keeps the 160 W 4-speaker layout with the changer. EX-L adds leather plus available XM where ordered.
Si 350 W premium AM/FM/6-disc CD/MP3/WMA, optional XM. The 2010 Si coupe (FG2) and Si sedan (FA5) carry the 350 W 7-speaker premium audio with the 6-disc in-dash CD changer plus MP3/WMA, and the XM-ready chassis where factory XM was ordered.
Hybrid (FD3) 160 W AM/FM/CD/MP3/WMA. The 2010 Civic Hybrid uses the same single-CD MP3/WMA head unit family as the LX, in the dual-tier dash with the IMA-ringed digital speedometer.
Tip: single-CD slot with the smaller two-line display = LX/LX-S/DX-G/Hybrid; same display family with a 6-disc magazine slot = EX/EX-L (sedan or coupe) or Si (sedan or coupe); no head unit in a US Civic = DX (factory).
Display-Based Serial Number Retrieval
Try the following for your 2010 Honda Civic:
The 2010 Honda Civic is equipped with a double-DIN audio system with a multi-line display. The serial number is found using the preset button method:
- Turn ignition to ON or ACC. The radio shows "CODE" or "ENTER CODE".
- Hold down buttons 1 and 6 at the same time for approximately 3 seconds.
- The display cycles through the serial number in two segments: first half (e.g.,
U3210) then second half (e.g.,L0482).
Tip: On certain 2010 Civic radios with nav screens, the serial may show up in the Settings → System Information menu. Check this before using buttons if your vehicle has a touchscreen unit.
2010 Civic Dealer-Mode Serial Procedure
The 2010 Civic's factory head units carry the same Honda dealer-mode shortcut used since 2006, so on the LX, LX-S, DX-G (Canada), EX, EX-L, Si, and Hybrid head units you can usually read the 8-character serial on the display without removing the radio.
Step 1 - Radio OFF, key in ACC (II). Power the head unit off (display dark, no station shown) and turn the ignition to the accessory position so the unit's wake line has 12 V.
Step 2 - Press and hold presets 1 and 6 together. Keep both held down for roughly two seconds until the unit wakes into its dealer/diagnostic display.
Step 3 - Read the U / L two-screen serial. The display alternates between a U-prefixed first half (for example U2200) and an L-prefixed second half (for example L0055). Combine them in order - U2200 + L0055 - to get the contiguous 8-character value 22000055. Some 2010 units flash S/N 22000055 on a single line instead.
Step 4 - Photograph and transcribe. Snap a photo of each half so you can re-verify later, then write the contiguous 8 characters down. The U and L letters are labels for the upper and lower halves and are not part of the value you submit.
Tip - Stubborn dealer mode. If presets 1 + 6 do not respond on the first try, power the unit off and re-attempt the hold a few times - this is a common quirk on the base LX/LX-S/DX-G. If the screen shows ERR, ERR5, or ERR7 instead of a serial, the radio is in cooldown - disconnect the battery for 30-45 minutes, reconnect, and try the 1 + 6 hold again.
Serial Number on the Unit
If the serial number cannot be accessed via display, use the hardware method.
Most Honda Civic original radios include a sticker with the serial number printed on the housing.
Basic process:
- Remove key from ignition.
- Lift away surrounding mounting frame.
- Remove fasteners holding the radio.
- Pull forward to inspect the label.
If the 1+6 method doesn't work on your 2010 Honda Civic:
- Power down the vehicle.
- Remove the radio bezel with a plastic pry tool. The 2010 Civic's larger radio is surrounded by a trim panel held by snap clips.
- Remove the 4 Phillips-head screws holding the radio in the bracket.
- Ease the unit out to access the serial label on the radio housing.
Tip: The 2010 Civic's larger radio weighs more than single-DIN units. Support it with both hands when sliding it out.
Removing the 2010 Civic Head Unit for the Chassis Label
If the 1 + 6 dealer-mode shortcut does not respond on your 2010 Civic, the fallback is to release the head unit from the centre stack and read the manufacturer's chassis label. The procedure is the same for the LX/LX-S/DX-G single-CD unit, the EX/EX-L/Si 6-disc changer, and the Hybrid head unit on the FA/FG/FD platform.
Safety first. Turn the ignition fully off and remove the key. Disconnect the negative battery terminal and wait at least three minutes for the SRS / airbag capacitors to fully discharge before reaching into the dash. Avoid the yellow airbag wiring near the steering column, and release each connector by its locking tab rather than tugging on the wires.
Tools to have ready. Plastic pry/trim tools (or a flat-blade screwdriver wrapped in painter's tape), a #2 Phillips screwdriver for the radio cage screws, an 8 mm socket on a short ratchet for the lower bracket screws, and a small parts tray.
Step 1 - Pop the lower storage panel. Open the small storage cubby to the left of the steering wheel and pry off the internal storage panel next to the power module. Behind it are two 8 mm Phillips-style screws securing the lower edge of the centre trim - back them out and set them aside.
Step 2 - Release the centre climate/audio bezel. The 2010 Civic's centre bezel surrounds both the climate controls and the head unit and is held by snap clips around its perimeter. Starting at the bottom corner, work a plastic trim tool behind the bezel and walk it around the perimeter, releasing each clip with a small outward pull. The bezel hinges out as a single assembly.
Step 3 - Disconnect the bezel-mounted harness. Tilt the bezel toward you, find the harness on the back of the climate-control panel, squeeze its lock tab, and disconnect. Set the bezel face-up on a soft cloth so the textured finish is not scuffed.
Step 4 - Remove the four radio mounting screws. The head unit is anchored to the dash sub-frame by four Phillips screws (some 2010 builds use Torx-style heads), typically one near each corner of the cage. Remove all four and keep them together.
Step 5 - Slide the unit out and disconnect. Pull the radio straight forward out of its opening, then release the locking antenna connector (Honda uses a non-standard antenna plug on this generation - back the locking ring off rather than levering on the cable) and unplug the multi-pin electrical harness(es) at the back.
Step 6 - Read and record the S/N. The 8-character serial is printed on a white or silver manufacturer label on the top or side of the chassis, typically beside an S/N tag and a barcode. Photograph the label and transcribe the value carefully - the digit zero is easy to confuse with the letter O, and the dealer-mode U / L labels are not part of the value you submit.
Reinstallation tips. Reconnect harnesses before sliding the unit back in; route the antenna cable so it is not pinched between the chassis and dash sub-frame; tighten the four screws snug but not over-torqued; align the bezel and press around its perimeter until each clip seats; and re-fit the two 8 mm screws inside the storage tray last.
Example: Honda Civic serial number label location
Serial Number Format Guide for 2010 Honda Civic
The 2010 Honda Civic radio serial number has the standard Honda OEM format:
U1234L5678– Confirmed Honda factory format – two halves displayed separately (U####thenL####), combined into a 10-character serial
Radio manufacturers for the 2010 Civic: Alpine (most common) or Panasonic. Nav models could use a separate module but usually use the same U/L two-part serial format.
Reminder Copy the full serial carefully – even one wrong character will generate an incorrect code.
What a Valid 2010 Civic Serial Looks Like
Serial numbers on the 2010 Civic's factory head units are typically 8 alphanumeric characters printed on the chassis label and shown in two halves on the dealer-mode display, with a U-prefix labelling the first 4 characters and an L-prefix labelling the last 4 (for example U2200 + L0055 for the contiguous serial 22000055). Prefix patterns can vary between production runs and supplier batches.
LX / LX-S / DX-G / Hybrid Single-CD Head Units. Typically an 8-character alphanumeric string starting with one or two leading digits, printed beside an S/N tag on the chassis label. On the dealer-mode display the same value is split U#### + L####. Treat any whitespace, dashes, or the S/N / U / L prefix labels as formatting only - they are not part of the serial you submit.
EX / EX-L (Sedan) / EX (Coupe) / Si Coupe / Si Sedan 6-Disc CD Head Units. Also 8-character alphanumeric serials on the same U/L dealer-mode pattern. Honda 6-disc head units of this era commonly carry an M family identifier within the contiguous 8-character string in addition to the dealer-mode U/L split, but the value you need is still the 8 contiguous characters from the chassis label or the combined two-screen display.
Important caveat: capitalisation matters, and prefixes and exact patterns can vary between production runs and supplier batches - always verify the value as printed on the label or shown on the dealer-mode screen rather than assuming a fixed prefix from another car.
Understanding Unlock Issues with Your Civic
If the radio comes on without displaying the "CODE" prompt, consider these scenarios:
- The unit might be unlocked — attempt normal operation first.
- Some 2010 Civic radios show "ENTER CODE" rather than just "CODE" — either prompt means the same thing.
- On nav-equipped units: the navigation display may come up first the code screen. Wait a moment for the audio system to boot separately.
Should no code screen appears at all, verify the radio fuse — a blown radio fuse will stop the unit from showing any display.
An incorrect code result on the double-DIN Honda is very often traced back to a misread serial. The serial label on the back of the radio carries both the serial and the part number — verify you submitted the serial (U####L####) and not the part number.
After a rejected attempt, do not entering more guesses — you only have 3 tries before a 60-minute lockout. Reach out to us with the serial for a no-charge reverification before retrying.
The double-DIN Honda radio uses an identical button layout as the older single-DIN platform:
- Preset buttons 1–5 — press each cycles through digits 0–9 to enter that digit of the code.
- Button 6 — press and hold for 2–3 seconds to confirm the full code.
For certain 2010 Civic navigation-equipped radios, the preset buttons may be labeled differently or accompanied by menu buttons. If that applies, the confirmation button is typically the rightmost preset or a dedicated ENTER button.
The serial number pattern for the double-DIN Honda radio follows one of:
U####L####— the standard two-part Honda serial (first half starts with U, second with L).HBM####— used on navigation and certain premium units.913A####— used by Alpine-manufactured modules.
The part number printed alongside start with 39100 or 39101 — never submit those. When in doubt, use the 1+6 button method to display the serial on the screen itself.
After 3 wrong entries, the mid-era Honda radio enters lockout mode and displays an error or refuses input. To exit it:
- Leave the ignition in the ON position — don't switch it off.
- Wait the full 60 minutes to elapse. Switching off at any point restarts the waiting period.
- Once 60 minutes have passed, the radio should show "CODE" again.
Navigation-equipped 2010 Civic units follow the same 60-minute lockout procedure. Should it remains locked after waiting, the unit may need a dealer diagnostic.