
Understanding the Radio Serial Number and How to Locate It on 2018 Pacifica
The initial step is to find and write down the radio's serial num.
Based on the head unit type used in your 2018 Pacifica, the serial can usually be found either through the display menu or by pulling the unit out and checking the label on the radio itself.
Below are the most common methods to identify your serial the right way.
2018 Pacifica - Which Radio Did You Get?
The 2018 Pacifica carried over the launch-year Uconnect 4 / 4C lineup with no major head-unit changes. From the factory, FCA fitted the same three units across the LX, Touring-L, Touring-L Plus and Limited trims, all sharing a common centre-stack bezel.
Factory units offered for 2018
- Uconnect 4 with 5-inch display (UAG) - 5-inch base touchscreen, no factory navigation; standard on LX and base Touring builds.
- Uconnect 4 with 8.4-inch display (UCQ) - 8.4-inch touchscreen with Apple CarPlay and Android Auto but no factory-activated navigation; common on mid-range Touring-L / Touring-L Plus builds.
- Uconnect 4C NAV with 8.4-inch display (UAQ) - 8.4-inch touchscreen with factory navigation, HD Radio and SiriusXM Travel Link, plus CarPlay and Android Auto; top-tier option frequently fitted to Limited.
How to tell yours apart
- Screen size is the quickest indicator - the 5-inch screen is UAG; the 8.4-inch screen is UCQ or UAQ.
- If the 8.4-inch unit has a native Nav tile and turn-by-turn guidance, it is the UAQ.
- An 8.4-inch unit with CarPlay/Android Auto but no factory nav button is normally the UCQ.
- Uconnect Theater rear-seat entertainment is a separate option and does not change the front head-unit code.
Find the Serial on the Radio Display
Try the following for your 2018 Chrysler Pacifica:
The 2018 Chrysler Pacifica — Chrysler's all-new minivan built on an entirely new platform — features the Uconnect 8.4" Classic (RA3). The Pacifica positions the 8.4" screen higher in the dash relative to earlier minivans, with the climate controls in a row below the screen.
Hold Climate Up, Climate Down, and Front Defrost simultaneously for 5 seconds with ignition in ACC or ON. Dealer Mode opens. Go to: System Info → Radio Part Info → Serial Number.
Display-Based Serial Number Retrieval
For 2018 Pacificas fitted with an 8.4-inch Uconnect 4 / 4C, you can usually read the serial number from a hidden dealer/diagnostic menu without removing anything from the dash.
Uconnect 4 (UCQ) and Uconnect 4C NAV (UAQ) - 8.4-inch
- Place the ignition in the RUN position so the 8.4-inch screen is fully booted.
- Press and hold the driver's temperature UP, temperature DOWN and front DEFROST buttons at the same time for roughly 7 seconds.
- When the dealer/diagnostic menu opens, choose the radio-information entries near the top of the list - they list serial numbers and revision data.
- Record the serial number exactly as printed, including leading letters such as
T0orTM9. - Press Done, or cycle the ignition off and back on, to leave the menu.
Uconnect 4 with 5-inch display (UAG)
- On the small 5-inch screen, an equivalent on-screen serial readout is not reliably documented for the 2018 Pacifica.
- If the hidden menu does not show one on the UAG, fall back to physically removing the unit and reading the chassis label.
Pulling Out the Radio to View the S/N on the Tag
If the serial does not appear on screen, the next step is checking the radio itself.
Many Chrysler radios require physical access to the ID label attached to the unit.
Typical approach:
- Start by completely turning off the engine - pull the key out.
- Then lift the dashboard bezel.
- Next, loosen the mounting points and pull the radio forward.
- Look for a barcode label showing the serial number.
If Dealer Mode is unavailable on the 2018 Chrysler Pacifica Pacifica, the RA3 unit must be physically removed from the elevated center stack. The Pacifica's tall center console allows access once the trim is detached.
- Pry off the center stack trim with a plastic trim tool.
- Remove the four Phillips mounting screws.
- Pull the unit forward to find the serial label on the top or side of the chassis.
Keep in mind: the Pacifica has a unique trim removal sequence compared to older Chrysler minivans — consult a model-specific guide if unsure.
Locate Serial on Pacifica's Radio Chassis
If the dealer menu is not available, or you cannot reach it because the radio is locked at the CODE screen, pulling the head unit out is the most dependable way to confirm the serial number on a 2018 Pacifica.
Safety preparation
- Turn the ignition fully off and remove the key fob from the cabin.
- Disconnect the negative battery cable and wait several minutes before working near the dash.
- Keep clear of yellow airbag wiring and connectors while moving panels around.
Suggested tools
- Plastic trim/panel pry tools to avoid scratches on the centre-stack plastics.
- A driver matching the radio retaining screws (typically Phillips or 7 mm).
- A camera/phone to capture the rear label clearly.
Removal overview
- Pry off the lower trim panel that frames the climate / shifter area first; the 2018 Pacifica centre stack is retained mainly by spring clips, not visible bolts.
- With the lower trim free, undo any small screws revealed behind it and walk a pry tool around the upper radio bezel until each clip releases.
- Pull the bezel forward and unplug any small switch / HVAC connectors on its back.
- Undo the screws now visible at the corners of the radio chassis.
- Slide the head unit out and unplug the main harness, antenna and any USB / AUX leads.
Locating the serial
- The serial sits on a printed label on the metal housing - usually on the top or side of the chassis.
- Copy the long alphanumeric string next to the barcode and double-check letters that look similar (O vs 0, I vs 1).
Tips
- Photograph the label before reinstalling so you have a permanent reference.
- Reassembly is the reverse: harnesses on, screws back in, snap bezel into place, reconnect the battery.
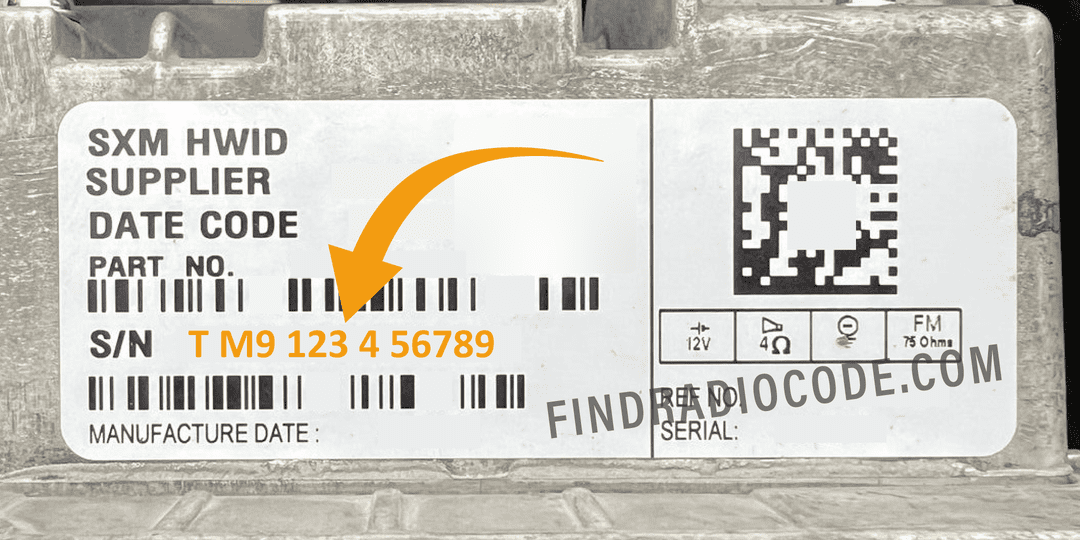
Example: Chrysler Pacifica serial number label location
These are the Common Serial Formats
Year Chrysler Pacifica RA3 radio serial patterns:
T00AM– Harman VP2 RA3 (primary format on Pacifica)T00BE– Continental-manufactured versionTM9– Earlier Harman production
Serial is 14 alphanumeric characters. Skip the part number (starts with P05064 or 68).
Common S/N Formats Used on 2018 Pacifica Units
The 2018 Pacifica could come with several different head units, each from a different supplier, so the serial-number style depends on which radio is in your van. The patterns below are the ones most often reported by owners and unlock services for this generation.
Continental / Harman-supplied Uconnect 4 and 4C (UCQ / UAQ)
- Often shown with a
T0prefix and an alphanumeric tail, for example a string resemblingT0xxx... - The prefix is printed inline with the rest of the serial on the chassis label.
Panasonic-supplied Uconnect units
- Frequently start with
TM9followed by additional digits or letters. - This pattern has been widely associated with Panasonic Mopar radios of this era; community reports note 2018 Pacifica hardware shifting toward Panasonic on certain builds.
Uconnect 4 with 5-inch display (UAG)
- Also carries a printed serial label on the chassis, but the prefix can vary by supplier batch - read the full string off the label rather than guessing.
If the alphanumeric you read does not match any of these patterns, double-check that you have the serial line and not the part number. The serial is usually the longest string and the one matched to the barcode on the label.
Got the Code? Here's How to Enter It
When you obtain the correct unlock code based on the S/N, you can restore default functionality by entering it into the unit.
The code entry process depends on the radio interface, but most 2018 Pacifica systems follow a similar structure using preset buttons, touch controls, or rotary knobs - depending on if it's a factory or an aftermarket unit.
You will typically see ENTER CODE displayed on screen.
Detailed Input Instructions for Pacifica 2018
To unlock on the 2018 Chrysler Pacifica Uconnect 8.4":
- Turn ignition to ON. The screen shows "ENTER CODE".
- Tap each digit of your 4-digit code.
- Radio auto-confirms after the 4th digit. No confirm button needed.
3 wrong attempts trigger a 60-minute lockout. Keep ignition ON for the full wait. Turning off the ignition restarts the timer.
Correct Entering Process
Once you have the correct anti-theft code for your 2018 Pacifica radio, entering it is quick - but the radio will lock itself if you keep guessing, so take it slowly.
Limited Attempt Warning
Only three attempts are allowed before lockout. Three wrong codes in a row send the radio into a WAIT state and the display reads WAIT. To clear it, you must leave the ignition in RUN with the radio powered for a continuous 30 minutes - the vehicle may be driven during that time. Cycling the key off does not shortcut this timer.
Entering the code
- Turn the ignition to RUN or ACC until the radio powers up and the CODE / Anti-Theft prompt appears.
- On Uconnect 4 / 4C 8.4-inch (UCQ/UAQ) radios, tap each digit on the touchscreen number pad.
- On the Uconnect 4 with 5-inch display (UAG), enter the code using the on-screen keypad.
- Confirm with OK/Enter when prompted.
- If correct, the radio returns to the normal home screen and audio is restored.
If it does not unlock
- Stop after the second wrong try and re-verify the serial you used.
- Make sure you copied the full serial without dropping leading letters or trailing digits.
- If
WAITappears, leave the radio powered with ignition in RUN for the full 30 minutes before trying again.
How Serial-Based Chrysler Pacifica Radio Unlock Works
Getting your radio code takes only a few easy steps.
- Locate your radio's serial - this is the only info required by our side.
Unlike when contacting the dealer, no VIN or paperwork is needed. - Enter the serial number into our generator above.
Our system checks it against a database of supported radios and automatically catches the matching security code. - In most cases, the code will appear instantly on the screen after payment and is also sent to your email , just in case.
If we need to check it manually, you'll be notified before checkout. - Once you receive it, simply enter it into the radio to restore the functionality.
What Caused the Radio to Lock?
The 2018 Chrysler Pacifica radio locks automatically after the battery is disconnected. Pacifica owners often experience this during battery replacement or after electrical repairs.
Typical trigger: battery replacement or disconnect. Other causes:
- Blown fuse after electrical work
- Buying the Pacifica used without a known code
- Battery disconnect during service
- Battery dead from storage
The code comes from the radio serial number only — not the VIN.
Understanding Unlock Issues with Your Pacifica
If no code prompt appears, the lock hasn't fired. Force it by briefly disconnecting the battery, then reconnect and turn to ON.
On the Pacifica RA3 label: serial = 14 chars starting with T00AM, T00BE, or TM9. Part number starts with P05064 or 68 — not the serial.
The Pacifica RA3 label carries both serial and part number. Serial: 14 chars, starts with T00AM, T00BE, or TM9. Part number (do not use): starts with P05064 or 68.
Double-check the label. Contact support for a free re-check if needed.
The Pacifica Uconnect RA3 uses touchscreen-only code entry. Tap each digit on the on-screen keypad. No physical buttons needed. Auto-unlocks after the 4th digit.
3 wrong entries lock the Pacifica RA3 for 60 minutes. Keep ignition in ON or ACC. Cutting power restarts the timer.