
OEM Radios Fitted to the 2013 Dodge Journey
Unsure which unit is in your dash? Match the screen and buttons with the 2013 Dodge Journey head units below. Each guide shows the serial prefixes and identification tips.
| Years | Factory radio | Serial starts with |
|---|---|---|
| 2008-2013 | Chrysler REL Alpine Alpine |
TQ1AA, TT1AA, TH1AA, THAAA, TCAAA
|
| 2008-2013 | MyGIG NTG4 REN Harman |
T00AM, T00BE, T0012
|
| 2008-2013 | MyGIG NTG4 RER Harman |
T00AM, T00BE, T0012
|
| 2009-2013 | Chrysler RET Alpine Alpine |
TQ1AA, TT1AA, TH1AA, THAAA, TCAAA
|
| 2011-2013 | MyGIG NTG4 REZ Harman |
T00AM, T00BE, T0012
|
| 2011-2014 | MyGIG NTG4 RHP Harman |
T00AM, T00BE, T0012
|
| 2013-2018 | Chrysler Uconnect 8.4 Panasonic |
TM9
|
| 2013-2018 | Uconnect 8.4 RA3 VP3 CA Harman |
T00AM, T00BE, T0012
|
Radio Serial Number Explained - Finding It on Your Dodge
The first step is to locate the radio's S/N.
Based on the head unit type used in your 2013 Journey, the S/N can be found either through the display menu or by pulling the unit out and checking the label on the radio itself.
Follow the steps below to identify your serial the right way.
Which Head Unit Is in Your 2013 Journey?
The 2013 Journey continues the JC-platform dash from the 2011 refresh, with the new Blacktop appearance package available alongside SE, SXT, Crew, and R/T. Five factory head units could be specified depending on trim and option packages.
RES base CD/MP3. Single-disc, non-touchscreen, monochrome text display, AUX/USB; standard on AVP and base SE. The radio face is a row of hard buttons either side of a small LCD.
RBZ 430 MyGIG (6.5-inch, no nav). Mitsubishi-built Media Center 430 with internal hard drive, Sirius and Bluetooth, optional on mid-trim cars. No NAV hard button on the bezel.
RHB 430N MyGIG (6.5-inch, with Garmin navigation). Sibling of the RBZ with built-in Garmin nav and SD card slot - identified by a NAV button on the bezel.
RE2 8.4-inch Uconnect (non-nav). Large 8.4-inch portrait RA-family touchscreen, rear camera and SiriusXM support, no on-screen map.
RB5 8.4N Uconnect with navigation. Top-tier 8.4-inch portrait touchscreen with Garmin-based map, voice control, and SD card slot.
Anti-theft is active by default on all of these radios, so any time the radio is interrupted from power it will prompt for the security code on the next start.
View the Serial via the Radio Display
Try the following for your 2013 Dodge Journey:
The 2013 Dodge Journey compact family crossover of this generation may feature a MyGIG radio (RER 730N) or an first-generation Uconnect system installed in the practical center stack. These older head units lack on-screen serial display.
The serial number can only be accessed by pulling the radio from the Journey's center stack and reading the barcode label on the unit casing.
Quick Method: Find the Serial Number on the Screen
The 8.4-inch Uconnect head units in the 2013 Journey - the RE2 and the RB5 - support a dealer/diagnostic mode that exposes the radio part number and serial number on screen. The smaller RBZ/RHB MyGIG and the base RES do not have a documented owner-accessible serial-display procedure on this car, so for those units the chassis-label method after removal is the reliable route.
RE2 / RB5 8.4-inch Uconnect Dealer Mode
With the ignition in RUN and the 8.4-inch home screen showing, simultaneously press and hold the HOT, COLD, and FRONT DEFROST buttons on the climate panel for around five seconds. The screen should switch to a service/dealer menu listing entries such as Radio Part Information or Radio Information - tap that entry to read the P/N (Mopar part number) and the S/N (serial number).
Photograph the screen so every character is captured exactly as displayed, then exit by tapping the on-screen back/exit control or by cycling the ignition off and on. If the three-button hold does nothing or no S/N field appears in the menu, your unit is likely a 6.5-inch RBZ/RHB MyGIG or the base RES - in those cases skip to the chassis-label removal method.
Check the S/N by Pulling Out the Radio
If the serial number cannot be accessed via display, use the hardware method.
Most Dodge Journey OEM radios include a sticker with the serial number printed on the chassis.
Step-by-Step:
- Turn off the vehicle.
- Remove the trim surrounding the radio.
- Unscrew the mounting bolts.
- Pull the unit forward to access the label.
The serial number is usually located near the manufacturer sticker.
To find the serial on the 2013 Journey's radio, you must remove it from the dash:
- Turn off the vehicle.
- Use a plastic trim tool to remove the center trim panel around the radio. The Journey's compact center stack releases with friction clips – start at the lower edge.
- Remove the 4 Phillips mounting screws securing the radio.
- Pull the unit out and locate the serial label on the top, side, or back of the radio.
Take care with the wiring harness. You don't have to disconnect it unless absolutely necessary.
Releasing the Unit to Access the S/N on the Tag
For 2013 Journeys fitted with the 6.5-inch RBZ/RHB MyGIG or the base RES, the printed chassis label is the dependable place to read the serial number because those units do not expose it on screen. The 8.4-inch RE2 and RB5 sit in the same dash cage and can also be pulled if the dealer-mode method is unavailable.
Safety Notice
Switch the ignition fully off and remove the key before you start. Disconnect the negative battery terminal and wait several minutes so the airbag/SRS capacitors can fully discharge. Stay clear of any yellow-jacketed wiring or yellow connectors behind the dash - those carry SRS signals and must not be pulled or probed. Use plastic trim tools rather than metal screwdrivers against the bezel and dash trim to avoid scratches and electrical shorts.
Tools You Will Need
You will need a T20 Torx bit and short-handled driver for both the upper-tray hidden screws and the four radio mounting screws, a plastic dash trim removal kit or wide nylon pry wedge for the bezel clips, a small Phillips screwdriver as a backup, and a soft cloth or microfibre to protect the centre console while you work.
Removal Overview
Open the upper dashboard storage tray on top of the dash and lift out the rubber mat at its base; this exposes two T20 Torx screws that secure the lower bezel/cubby trim. Remove those two screws, then carefully unclip the lower trim around the radio with a plastic trim tool, working a section at a time. Pry the HVAC/climate-control panel free at its lower edge; remove any sub-screws revealed beneath the silver trim line. Remove the four T20 Torx screws (two upper, two lower) holding the radio chassis to the dash cage, pull the unit straight back, and disconnect the antenna lead and the multi-pin connectors at the rear before lifting the radio clear.
Where the Serial Is Printed
Look at the top, side, or rear face of the metal chassis for a white printed label. The serial number is the alphanumeric string near or directly under the barcode and is normally adjacent to a Mopar part number that begins with P05. On a RBZ/RHB MyGIG the label often sits on the upper face of the chassis, while on the RES base unit it is more often on the side or rear panel.
Reinstallation Tips
Photograph the label so the part number, model designator (RBZ, RHB, RE2, RB5, or RES), and serial are all captured before you reinstall. Reconnect each plug fully so it audibly clicks home, slide the radio back into its cage, and start the four T20 Torx screws by hand to avoid cross-threading. Press the bezel, climate panel, and upper-tray screws back so every clip seats audibly, reconnect the battery, and cycle the ignition to verify the radio prompts for its code.
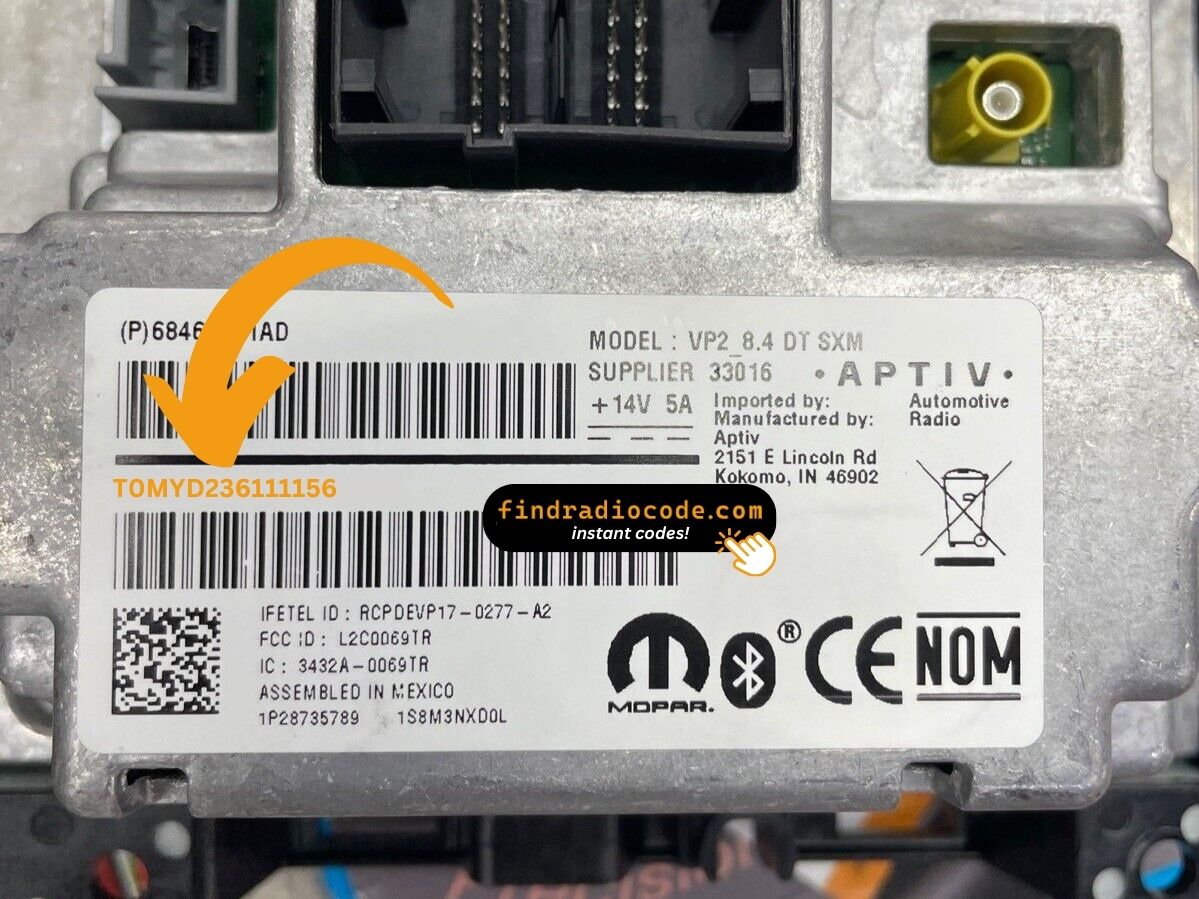
Example: Dodge Journey serial number label location
Standard Serial Number Patterns on This Radio
Typical radio units in the 2013 Dodge Journey and their serial formats:
- MyGIG REP 430 (non-nav touchscreen) – Serial prefix:
TM9 - MyGIG RBZ 430 (6.5" touchscreen) – Serial prefix:
TM9orT00AM - MyGIG RER 730N (navigation) – Serial prefix:
TM9 - RES 130 (base CD/MP3) – Serial prefix:
TM9orT00AM
All serials are 14 characters. Ensure to use the serial number, not the part number (P05064... or 68...).
Typical Serial Number Examples for 2013 Journey
Serial numbers on the 2013 Journey factory radios are alphanumeric strings printed on a white chassis label alongside a barcode. They typically begin with the letter T and span roughly 12 to 14 characters in total, with small variations between supplier runs and head-unit families.
RBZ 430 / RHB 430N MyGIG (6.5-inch)
RBZ and RHB units are Mitsubishi-built and most often carry serials beginning with T00AM or T00BE. A typical string looks similar to T00AM3444T0105. The Mopar part number printed beside the serial commonly opens with P05 and is a separate field from the serial.
RE2 / RB5 8.4-inch Uconnect (RA-family)
The 8.4-inch RA-family units commonly carry serials in the T00AM prefix family, with some supplier batches showing TM9 patterns instead. The label is found on the top or side of the chassis next to the Mopar P05 part number.
RES Base CD/MP3
The RES base radio carries a Mopar/Harman-style serial on its chassis sticker, normally beginning with T and printed beside or below the barcode. The label also lists a model designator and a Mopar part number for cross-reference.
Reading the Label Correctly
Anything that begins with P is a part number rather than the serial - the serial almost always begins with T on these Mopar/Mitsubishi/Harman-built radios. Copy every character exactly as printed, including any leading zeros, because a single wrong character will produce a wrong unlock code. Pay particular attention to the digit 0 versus the letter O, which can look similar in this print.
Inputting the Security Code
Now that you've generated 2013 Dodge Journey radio code from the serial number, you're ready to reactivate the radio.
Many drivers get stuck at this stage because input process can look different across radio versions, but it's usually easy.
When the radio shows CODE, it means the unit is waiting for the correct numbers.
In-depth Input Instructions for Journey 2013
To input the unlock code on the 2013 Journey's radio:
- Turn ignition to ON. The radio shows "CODE" or "ENTER CODE".
- Touchscreen models (REP/RBZ/RER): Tap the touchscreen number pad to enter each digit.
- Non-touchscreen models (RES/REF): Press preset button 1 repeatedly for the first digit, button 2 for the second, 3 for the third, 4 for the fourth. Hold Enter/OK to confirm.
Warning: 3+ wrong attempts trigger a lockout. Keep the Journey's radio powered for about 60 minutes to reset it.
Detailed Input Instructions for Journey 2013
The 2013 Journey ships with anti-theft active by default on all of its factory radios, so any battery disconnect, radio swap, or extended power loss will trigger the CODE prompt on the next ignition cycle. Enter the code carefully - the unit limits how many tries you have before it goes into a timed lock-out state.
Limited Attempt Warning
The radio only allows three consecutive wrong tries before a timed WAIT state kicks in. Verify each digit on the screen against your code sheet before pressing OK. If you see the WAIT message, leave the ignition in RUN for the documented cool-down period (around 30 minutes) - do not unplug the battery, as that does not clear the lockout, and the vehicle may be driven during the cool-down.
Code Entry Procedure
Turn the ignition to ACC or RUN to power up the radio and wait for the CODE or Please Enter Anti-Theft Code prompt. On the base RES, press preset button 1 the required number of times to set the first digit of the four-digit code, then preset 2 for the second digit, 3 for the third, and 4 for the fourth. On the RBZ/RHB MyGIG and the 8.4-inch RE2/RB5 Uconnect, tap each digit on the on-screen number pad in turn. Confirm the displayed digits match your code exactly before pressing the OK/ENTER control (or the rightmost preset on RES variants) to submit.
Behaviour on Incorrect Entry
The screen will indicate that the code is wrong and may show a WAIT message after the third consecutive failure. Do not retry until the 30-minute cool-down has fully cleared - the radio must remain powered with the ignition in RUN throughout that window. If repeated correct entries still fail after the wait clears, stop and re-verify the serial and code with your provider rather than continuing to guess.
How the Code Retrieval Process Works for Dodge Journey 2013
To get the code, you'll take only 4 simple steps.
- Locate the radio's serial number - this is the only info required to generate the correct unlock code.
Unlike dealership lookup, no VIN or paperwork is needed. - When you've found the S/N, type it into the form above.
Our system checks it against a database of supported radios and automatically finds the matching anti-theft code. - In most cases, the code will appear instantly on the screen after payment and is also sent to your email for backup.
If manual verification is required (rare situations), you'll be notified before checkout. - When you get it, simply enter it into your radio to restore full functionality.
Why Is the Radio Asking for a Code?
2011–2013 Journey owners encounter radio lockouts most often because of:
- Battery replacement from heavy family use — as a popular daily family vehicle means batteries get replaced regularly, and each replacement triggers the lock.
- Battery disconnect or dead battery — the primary trigger on these older units.
- Blown fuse — a blown radio fuse also activates the lock.
- Used purchase — the Journey was a popular family used buy without the prior code leaves the radio locked.
The unlock code is tied to the radio serial and does not expire.
Understanding Unlock Issues with Your Journey
A rejected code on the Journey's early Uconnect typically indicates a serial number mismatch. The label has both a serial number (TM9 or T00AM, 14 characters) and a part number (P05064... or 68...) — submit only the serial.
Re-read the label and reach out for a free re-check if needed.
The Journey's early Uconnect radio must be removed to read the serial label. On the label:
- Serial number — 14 characters, beginning with
TM9orT00AM. Submit this. - Part number — prefixed by
P05064or68. Do not use.
Copy all 14 characters carefully — similar-looking characters are easy to mix up on printed labels.
How you enter the code on the Journey depends on which radio is fitted:
- Touchscreen models (MyGIG REP 430, RBZ, RER 730N) — Tap digits on the touchscreen. The display confirms each digit as you tap it.
- Non-touchscreen models (RES 130, REF) — Press preset button 1 cycling to set the first digit, button 2 for the second, 3 for the third, 4 for the fourth. Press and hold Enter/OK to confirm.
Not sure of your radio: a touchscreen means touchscreen entry; a non-touch face means preset buttons.
After 3 failed entries on the Journey's MyGIG, a 60-minute lockout activates. The display will show "WAIT":
- Keep the radio powered — ignition stays in ON, engine off is fine.
- Allow the full 60 minutes.
- Cycling the ignition restarts the wait.
Once clear, try the verified code again.
When no "CODE" screen appears after a battery event:
- Confirm the ignition is in ON (not ACC) and give it a moment to initialize.
- Check the radio fuse — fuse failure stops the radio.
- On some older units, pressing the power button on the radio face can wake the code prompt.
If the radio stays dark, power issue is the most likely cause.