Finding the Radio S/N for Honda
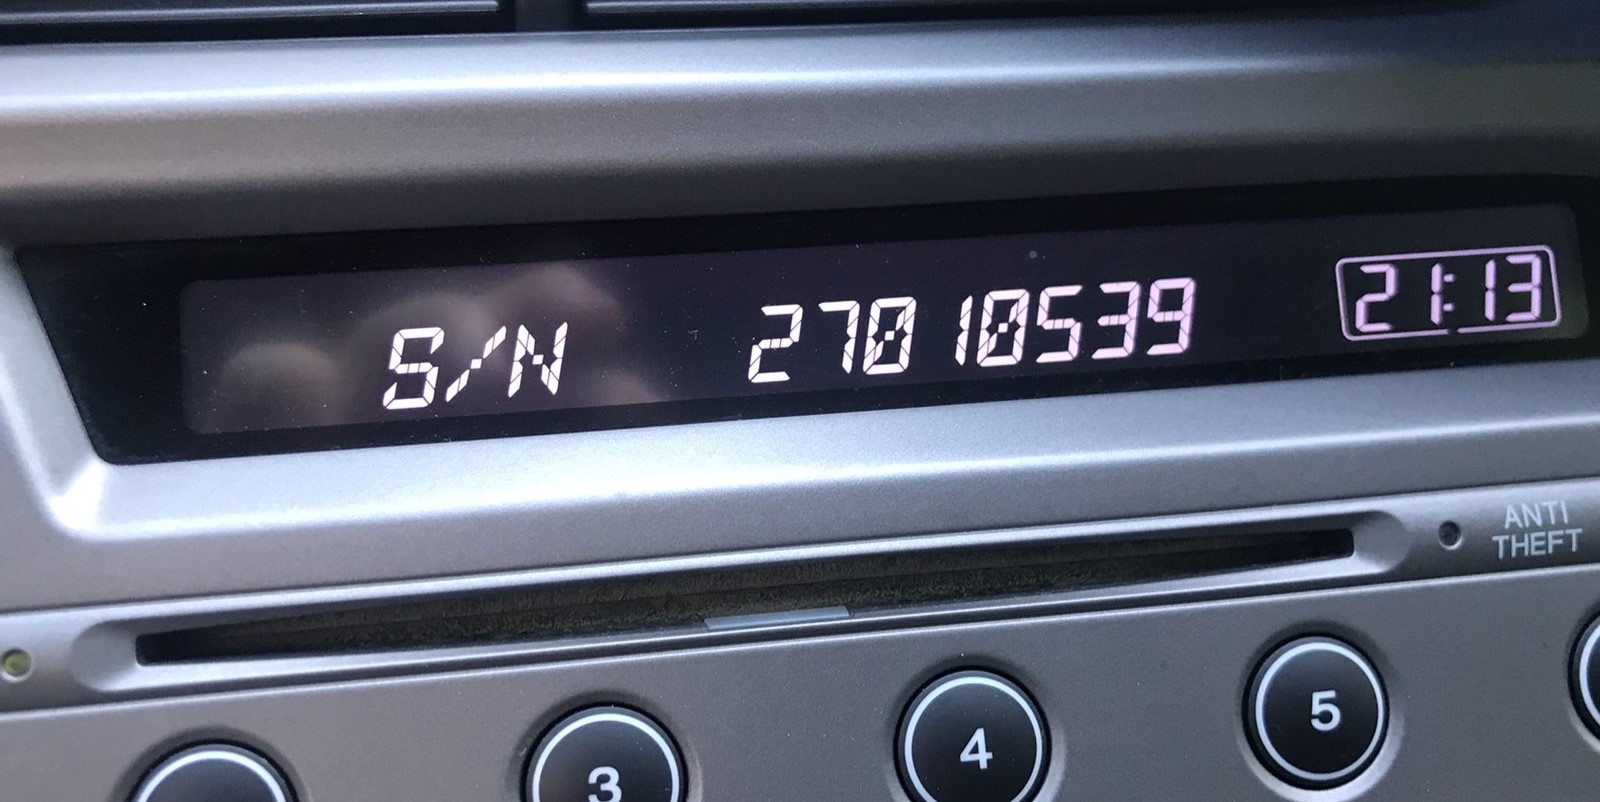
The initial step is to find and write down the radio's S/N.
Based on the head unit type used in your 2017 Civic, the serial can be accessed either through the screen menu or by pulling the unit out and checking the label on the radio itself.
Follow the steps below to identify your S/N quickly.
2017 Honda Civic factory radios
For 2017, Honda kept the two-tier head-unit lineup but rolled Apple CarPlay and Android Auto into the 7-inch units across the range, and added the Si trim with a sport-tuned audio package:
- 5-inch Display Audio - LX trim. Color LCD with physical buttons, Bluetooth, single USB, rearview camera. No CarPlay/Android Auto, no touchscreen.
- 7-inch Display Audio with HondaLink - Sport, EX, EX-T, EX-L, Touring (sedan/coupe/hatchback). Capacitive WVGA 800x480 touchscreen, Apple CarPlay, Android Auto, HD Radio, SiriusXM on upper trims, HondaLink connected services.
- Civic Si (sedan + coupe, mid-2017) - 7-inch Display Audio paired with a 450-watt 10-speaker premium sound system, the first Si fitment in this generation.
- Touring - adds Garmin Honda Satellite-Linked Navigation inside the 7-inch unit and 10-speaker audio.
All variants enforce the standard Honda anti-theft 5-digit code after a power interruption.
Find the S/N on the Radio Screen
The method for 2017 Honda Civic is this:
The 2017 Honda Civic may be equipped with Honda's Display Audio touchscreen (5" depending on trim) or a base non-touchscreen radio. Either type support serial number display via the 1+6 button method:
- Turn ignition to ON. Let the radio to turn on. The screen shows "CODE" if locked.
- Simultaneously press preset buttons 1 and 6 for about 5 seconds.
- The serial number shows in two halves (e.g.,
U3210+L0482).
Also: On 2017 Civic with the Display Audio touchscreen, navigate to Settings → System → Device Information – the serial may be listed there instead of the button combination.
Access the Serial by Pulling Out the Unit
If the serial number cannot be accessed through menu, use the removal method.
Most Honda Civic factory radios include a label with the serial number printed on the casing.
Process details:
- Remove key from ignition.
- Gently detach surrounding panel pieces.
- Remove fasteners holding the radio.
- Slide outward to inspect the label.
If neither methods display the serial on the 2017 Honda Civic:
- Power down the vehicle.
- Remove the radio surround. The 2017 Civic's modern dashboard uses friction clips.
- For Display Audio models: Remove the mounting screws (Phillips) securing the display module.
- For standard radios: Remove the 4 Phillips screws holding the head unit.
- Slide the unit forward and locate the serial on the sticker on the unit casing.
Tip: The touchscreen unit is larger and more tightly fitted than the standard radio. Be careful when removing it.
Removing the head unit on a 2017 Honda Civic
Safety first. Disconnect the negative battery cable, wait at least a few minutes for SRS capacitors to discharge, and avoid leaning on the steering-wheel airbag area. Remember that battery disconnection is what triggers the code lock - if you only need the serial, do the removal-free 1+6 procedure first.
- The 10th gen Civic dash uses an integrated bezel that surrounds both the touchscreen and the climate panel. Start at the lower edge: lift it slightly, then pull straight toward the seat to walk the upper clips out.
- Use plastic pry tools or a padded 3-inch putty knife. Metal tools will scuff the soft-touch grain on the 2017 Civic dash, which is hard to repair.
- The 7-inch touchscreen is bonded into the bezel assembly - support it with one hand as it tips forward and unplug the LVDS/ribbon and antenna leads before fully separating it from the dash.
- Remove the four chassis screws behind the bezel evenly. The audio module slides straight out on its own brackets.
- The thin gloss-black or silver ring around the screen comes off after the unit is free; do not try to peel it off first.
Take photos as you go - the connectors look similar but each must return to its original port.
Example: Honda Civic serial number label location
These are the Common Serial Formats
Based on the radio equipped in the 2017 Honda Civic:
U1234L5678– Standard Honda OEM formatHBM####– Used in Display Audio and nav-equipped units913A####– Some Alpine-manufactured radios
The 2017 Civic may have: base CD radio (U/L format), Display Audio 5"/7" (HBM format), or navigation unit (HBM format). All require a 5-digit unlock code.
Important Make sure you copy the serial number, not the part number (which starts with 39100, 39101, or similar Honda part coding).
2017 Civic radio serial format
You should expect an 8-character alphanumeric Honda serial on the 2017 Civic Display Audio - letters and digits mixed, no spaces or hyphens. Common 10th-gen prefix patterns start with U or T followed by additional digits and letters. Transcribe it carefully and watch for the usual look-alikes: 0 vs O, 1 vs I, 5 vs S, 8 vs B. One wrong character returns the wrong code.
Unlock Your 2017 Honda Civic Radio in Minutes - How It Works
To get the code, you'll take only a few simple steps.
- Find your radio's serial - this is the only information required by our side.
The difference with the dealership lookup is that no VIN is needed. - When you've found the S/N, type it into the form above.
The system checks it against a database of supported factory radios and automatically catches the matching anti-theft code. - In most cases, the code will appear instantly on the screen after you pay and is also sent to your email , just in case.
If manual verification is required (rare situations), you'll be informed before checkout. - When you receive the code, simply enter it into the radio to restore full functionality.
Got the Code? Here's How to Enter It
When you obtain the correct unlock code based on the serial number, you can restore default functionality by entering it into the unit.
The code entry process depends on the head unit design, but most 2017 Civic systems follow a similar structure using preset buttons, touch controls, or rotary knobs - depending on if it's a factory or an aftermarket unit.
You will typically see CODE displayed on screen.
Entering Process Explained
To enter the code on the 2017 Honda Civic:
- Ignition ON. Radio shows "CODE" or "ENTER CODE".
- Non-touchscreen models: Use preset buttons 1-5 to cycle to each digit, then hold button 6 to confirm.
- Display Audio touchscreen: An on-screen keypad may appear. Enter each digit and press "Enter" or "OK".
Lockout: Three wrong entries cause a 60-minute lockout. Leave ignition ON. Don't cycle the key or the timer resets.
Entering the 5-digit code on a 2017 Civic
- Turn the ignition to ON so the head unit boots and shows
CODEor a numeric pad on screen. - Tap or press 1, 2, 3, 4, 5, 6 on the keypad - Honda 10th-gen codes only ever use digits 1 through 6.
- Confirm with the on-screen Enter arrow (7-inch units) or the right-arrow preset on the 5-inch LX unit.
- Multiple wrong attempts trigger a 1-hour lockout. Keep the ignition ON for the full hour - turning it off restarts the timer.
Why Is the Radio Asking for a Code?
Honda's Display Audio system retains the same anti-theft design as earlier radios: losing battery power activates a code request at next startup. This affects both the non-touchscreen radio and the Display Audio unit.
- Battery replacement — the most common trigger.
- Battery disconnect during repairs — any work that interrupts battery power will activate the lock.
- Completely dead battery — a fully discharged battery has the same result.
Note: many higher-end Display Audio models from the 2014–2021 period might not use a traditional code-based lock — if the radio never showed "CODE" after losing power, it could have a different anti-theft method tied to the vehicle VIN.
Understanding Unlock Issues with Your Civic
The Display Audio platform applies the same three-try lockout as older Honda radios. To exit lockout:
- Maintain the ignition in ON or ACC — avoid turning it off.
- Allow the full 60-minute period. The touchscreen might dim during this time — this is expected.
- After 60 minutes, the radio re-displays "CODE" and another attempt is possible.
For touchscreen units, the lockout countdown operates even when the screen is off. Simply leave the vehicle running or the ignition on ACC until the timer expires.
If the Display Audio screen powers on but shows the home screen without a "CODE" prompt, consider these points:
- The radio may not be locked — some battery changes don't trigger the lock if power was restored fast.
- Certain Display Audio units, the code prompt appears only on the audio portion of the screen, not the navigation display — give it a moment after startup.
- Check the Settings → System → Device Information route; if the serial is visible there, the unit may still be functional without a code.
If none of these apply, checking the radio fuse is the next step — a failed fuse prevents the radio from powering on at all.
The Display Audio era includes radios using multiple serial prefixes depending on the trim level:
U####L####— base CD radio serial (10 characters, two halves).HBM####— Display Audio 5"/7" and navigation modules.913A####— some Alpine OEM units.
Part numbers on the same label begin with 39100 or 39101 — do not submit these. If uncertain, use the Settings → Device Information menu or the 1+6 button method to display the serial directly from the unit.
Entry method depends on the exact radio variant in the 2014–2021 Civic:
- Non-touchscreen base radio: Use preset buttons 1–5 to scroll to each digit, then hold button 6 to confirm — identical to older Honda platforms.
- Display Audio 5" or 7" touchscreen: An on-screen numeric keypad appears when the code prompt is active. Enter the digits and press OK or Enter on screen.
Should the touch input not work, try the physical preset buttons — certain units accept both input method. Ensure the screen is fully booted before attempting entry.
On the Display Audio, a rejected code usually points to the serial was misread. Either retrieval method can produce the correct serial — confirm that the serial you submitted came from the radio itself and not from an online database.
After one failed entry, pause and reach out before trying again — a second wrong attempt brings you closer to the 60-minute lockout. A no-charge serial reverification is available on request.