
Understanding the Radio Serial Number and How to Locate It on 2018 CR-V
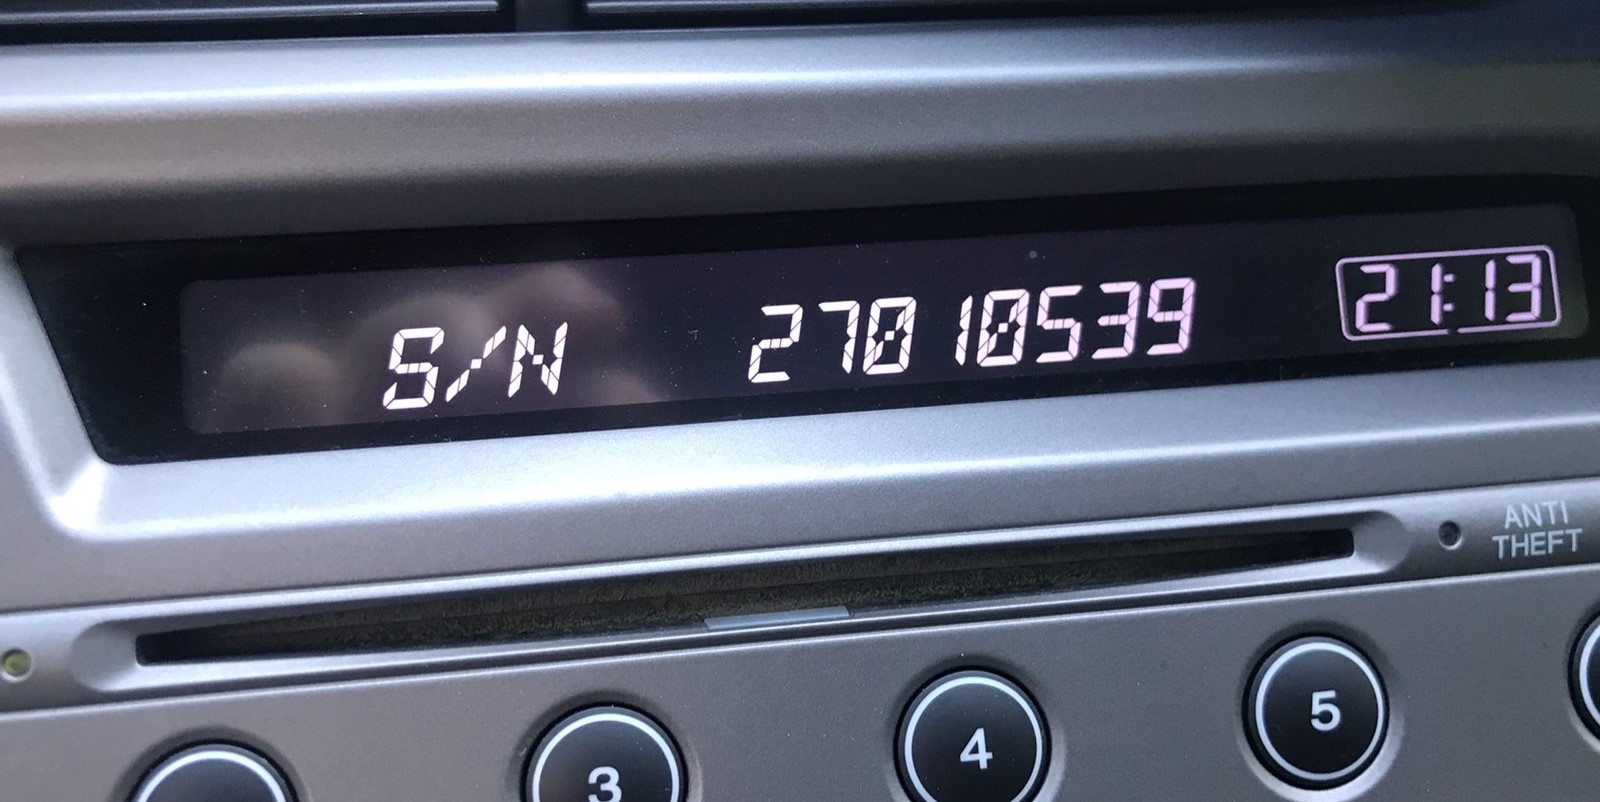
The first part is to locate the radio's S/N.
Depending on the radio unit fitted in your 2018 CR-V, the S/N can usually be accessed either through the display menu or by pulling the unit out and checking the label on the radio itself.
Below are the most common methods to identify your serial the right way.
Factory radios fitted to the 2018 Honda CR-V
- 5-inch color LCD audio system on the LX trim, controlled by physical buttons and a volume knob, with AM/FM, Bluetooth HandsFreeLink, a single USB input and a 4-speaker layout.
- 7-inch Display Audio touchscreen on EX, EX-L and Touring, with capacitive controls, SiriusXM, Pandora and a redesigned home screen versus the 2017 launch software.
- Apple CarPlay and Android Auto support added to the 7-inch Display Audio for the 2018 model year, available on EX, EX-L and Touring through the front USB port; LX continues without smartphone projection.
- EX-L pairs the 7-inch head unit with the 8-speaker premium audio package and HD Radio, while Touring adds Honda Satellite-Linked Navigation, voice recognition and an integrated subwoofer to the same head unit.
Check the Display First - Serial Retrieval Without Tools
These are the steps you need to follow for 2018 Honda CR-V:
The 2018 Honda CR-V could have Honda's Display Audio system (5" depending on trim) or a standard non-touchscreen radio. Both types support serial number retrieval via the 1+6 button method:
- Turn ignition to ON. Let the radio to boot. The screen shows "CODE" when locked.
- Simultaneously press preset buttons 1 and 6 for about 5 seconds.
- The serial number appears in two halves (e.g.,
U3210+L0482).
Alternative: On 2018 CR-V with the Display Audio touchscreen, look in Settings → System → Device Information – the serial may be displayed there without needing the button combination.
Reading the serial on a 2018 CR-V factory radio
- Switch the ignition to ACC or ON but leave the audio unit powered off, so the dash is live without the radio playing.
- Press and hold preset buttons 1 and 6 simultaneously on the audio unit's preset row, then press the radio power button while continuing to hold the two presets to put the unit into service mode.
- Record the four characters shown after the letter U on the first screen, then wait for the display to alternate and record the four characters shown after the letter L on the second screen.
- Concatenate the two halves in order to obtain the 8-character serial; the U and L are screen labels rather than part of the serial.
- If the screens do not appear - which is more likely on the Touring navigation head unit - the chassis label exposed during removal carries the same serial, and a Honda dealer can read it through the diagnostic connector with the HDS tool as a fallback.
- Some 5th gen CR-V Display Audio units in the US market are VIN-paired and may not display a separate serial because the unit re-authorizes itself from the car when power returns; that is normal and means an unlock code is not required.
Releasing the Radio Unit to Access the S/N on the Tag
If the serial does not appear on display, the next step is checking the radio itself.
Many Honda radios require physical access to the serial tag attached to the unit.
Common approach:
- Start by completely powering down the engine - pull the key out.
- Then lift the trim panel.
- Next, unscrew the mounting points and slide the radio forward.
- Look for a factory sticker showing the serial number.
If neither methods work on the 2018 Honda CR-V:
- Turn off the vehicle.
- Detach the center stack trim panel. The 2018 CR-V's integrated dashboard uses plastic clips.
- For Display Audio models: Remove the fasteners (Phillips) securing the display module.
- For standard radios: Unscrew the four screws holding the radio unit.
- Slide the unit out and read the serial on the sticker on the chassis.
Tip: The touchscreen unit is wider and more integrated than the standard radio. Be careful when extracting it.
Removing the radio on a 2018 CR-V to read the serial label
- Disconnect the negative battery terminal and wait several minutes for the SRS capacitors to discharge before working in the dash.
- Open the storage cubby below the audio unit and remove the two Phillips screws on the underside of the center trim piece that are reachable from inside the cubby.
- Pull the center trim panel rearward starting at the lower edge to release its perimeter clips, then disconnect the hazard switch and any accessory harnesses on its rear and set it aside on a soft cloth.
- Remove the screws or bolts now visible around the audio unit bracket, supporting the head unit from underneath as the last fastener comes out so it does not drop into the dash.
- Slide the audio unit straight out of the dash opening, disconnect the antenna lead and the multi-pin connectors on the rear, and read or photograph the chassis label so the printed 8-character serial can be compared with the on-screen value.
- Use only plastic trim tools throughout to avoid scratching the soft-touch surround, and keep the screws sorted because lengths can differ between the trim panel and the head-unit bracket.
Example: Honda CR-V serial number label location
What a Valid Serial Number Looks Like
Depending on which radio equipped in the 2018 Honda CR-V:
U1234L5678– Most common Honda OEM formatHBM####– Used in Display Audio and navigation units913A####– Certain Alpine-manufactured radios
The 2018 CR-V may have: base CD radio (U/L format), Display Audio 5"/7" (HBM format), or navigation unit (HBM format). All require a 5-digit unlock code.
Important Ensure you copy the serial number, not the part number (which starts with 39100, 39101, or similar Honda part coding).
What the 2018 CR-V radio serial usually looks like
- The serial returned by the on-screen procedure is typically 8 characters long and is the concatenation of the four characters after U on screen one and the four characters after L on screen two.
- The U and L letters are simply labels for the upper and lower halves of the serial and are not entered as part of the value.
- On most 2018 CR-V factory units the serial is numeric, although some chassis labels carry a longer alphanumeric string with a manufacturer prefix that should be ignored beyond the 8 matching characters.
- A representative format reads U1234 followed by L5678, which corresponds to a stored serial of 12345678 for the lookup.
- If the printed and displayed serials disagree, the on-screen value is generally the one accepted by the official Honda radio code portal, with the chassis label retained as a fallback when the service screen cannot be triggered.
Entering Your Unlock Code
Once the system gives you 2018 Honda CR-V anti-theft code from the serial number, you're ready to reactivate the radio.
Some drivers get stuck at this stage because input methods can look different across radio versions, but it's usually simple.
When the radio shows ENTER CODE, it means the unit is waiting for the correct numbers.
The Correct Way to Enter It
To enter the code on the 2018 Honda CR-V:
- Ignition ON. Radio displays "CODE" or "ENTER CODE".
- Non-touchscreen models: Press preset buttons 1-5 to select each digit, then hold button 6 to confirm.
- Display Audio touchscreen: An on-screen keypad is displayed. Enter each digit and press "Enter" or "OK".
Lockout: 3 wrong entries cause a 60-minute lockout. Leave ignition ON. Do not cycle the key or the timer starts over.
Entering the unlock code on a 2018 CR-V radio
- Turn the ignition to ON and power the audio unit so that CODE or ENTER CODE appears on the 5-inch LX screen or the 7-inch Display Audio screen.
- On the LX 5-inch unit, press the preset button that matches each digit of the 5-digit code, one press per digit and in order; the code is normally accepted after the fifth digit without holding any button.
- On the 7-inch Display Audio used by EX, EX-L and Touring, tap the on-screen number pad to enter each digit and press the on-screen ENTER soft key once the full 5-digit code is visible.
- If the unit re-authorizes by itself once the battery is reconnected, no code entry is required; this VIN-pairing behavior is documented for many 5th gen CR-V Display Audio units in the US market.
- If the wrong code is entered repeatedly, the unit enters a temporary lockout that requires the ignition to be left in the ON position for about an hour before another attempt can be accepted.
How the Code Retrieval Process Works for Honda CR-V 2018
- Rather than relying on Honda dealership lookup or online threads you can find the code online with the radio S/N.
- Identify the serial number. It is always present on the unit itself, and sometimes you can see it on the CR-V's display.
- Enter it into the form above, and our software will identify the correct 2018 CR-V unlock code.
- After receiving your code, type it in using CR-V's radio controls to release the blockade successfully.
- The entire process takes just a short moment and requires minimal effort.
Why Is the Radio Asking for a Code?
Honda's Display Audio system carries the same anti-theft design as earlier radios: losing battery power causes a code request at next startup. Applies to both the base radio and the Display Audio unit.
- Battery replacement — by far the most frequent cause.
- Battery disconnect during repairs — any work that interrupts battery power will re-engage the lock.
- Completely dead battery — a drained battery also triggers the request.
Note: many higher-end Display Audio models from the 2014–2021 period do not use a traditional code-based lock — if the radio never showed "CODE" after a battery change, it may use a different anti-theft method linked to the vehicle VIN.
Fixing Common Code Entry Problems for 2018 CR-V
If the Display Audio screen powers on but goes straight to the home screen without a "CODE" display, check the following:
- Anti-theft may not have triggered — some battery changes don't trigger the lock if power was restored fast.
- On some Display Audio units, the code prompt appears only on the audio portion of the screen, not the navigation display — wait a moment after startup.
- Check the Settings → System → Device Information route; if the serial is visible there, the unit could still be functional without a code.
If none of these apply, a fuse check is the next step — a blown fuse will stop the radio from showing any display at all.
Code entry depends on the exact radio variant in the 2014–2021 CR-V:
- Non-touchscreen base radio: Press preset buttons 1–5 to cycle to each digit, then hold button 6 to confirm — identical to older Honda platforms.
- Display Audio 5" or 7" touchscreen: An on-screen numeric keypad appears when the code prompt is active. Tap each digit and press OK or Enter on screen.
Should the touch input not work, try the physical preset buttons — some units accept both input method. Ensure the screen is fully booted before attempting entry.
On the Display Audio, a rejected code most often means the serial was misread. Both the button method and the settings menu can produce the correct serial — confirm that the serial you submitted came from the radio unit and not from an online database.
If the code was already entered once and rejected, stop and reach out before trying again — a second wrong attempt brings you closer to the 60-minute lockout. A no-charge serial reverification is available on request.
The Display Audio era covers radios using multiple serial prefixes depending on which unit was fitted:
U####L####— base CD radio serial (10 characters, two halves).HBM####— Display Audio 5"/7" and navigation units.913A####— some Alpine OEM units.
Part numbers on the same label begin with 39100 or 39101 — do not submit these. When in doubt, use the Settings → Device Information menu or the 1+6 button method to pull the serial directly from the radio.
The Display Audio platform enforces the same 3-attempt lockout as earlier Honda radios. To recover:
- Keep the ignition in ON or ACC — avoid turning it off.
- Allow the full 60-minute period. The touchscreen may go to sleep during this time — that's normal.
- After 60 minutes, the code prompt returns and you can.
For touchscreen units, the lockout countdown operates even when the screen is off. Just leave the vehicle running or the ignition on ACC for the full hour.