
Identify the 2010 Jeep Commander Radio Model
Even for one model year, the 2010 Jeep Commander could leave the factory with more than one head units. Pick the unit that looks like yours.
| Years | Factory radio | Serial starts with |
|---|---|---|
| 2007-2010 | Chrysler Media Center 640 RE2 Panasonic |
T0012, T00BE
|
| 2007-2010 | Chrysler REC Alpine Alpine |
TQ1AA, TT1AA, TH1AA, THAAA, TCAAA
|
| 2008-2013 | Chrysler REJ Alpine Alpine |
TQ1AA, TT1AA, TH1AA, THAAA, TCAAA
|
| 2008-2013 | MyGIG NTG4 REN Harman |
T00AM, T00BE, T0012
|
| 2008-2010 | MyGIG NTG4 REP Harman |
T00AM, T00BE, T0012
|
| 2008-2013 | MyGIG NTG4 RER Harman |
T00AM, T00BE, T0012
|
| 2008-2012 | MyGIG NTG4 REW Harman |
T00AM, T00BE, T0012
|
Serial Number Location Guide for Jeep Commander 2010
The important fact to know is that factory radios use a specific S/N to identify each unitindividually.
Your security system links the code directly to the serial.
Unlike vehicle-specific data such as VIN or registration info, it is not determined by the model or production year, so you'll be able to retrieve it even if you have a radio that you bought afterwards.
Depending on the manufacturer and radio installed in your Jeep Commander, the retrieval method is different.
These are the most reliable ways to locate it.
Which Head Unit Is in Your 2010 Commander?
For its final model year (2010 was the last year of the XK Commander), the lineup is the most diverse of the generation. RES Media Center 130 stayed as the base radio, the RAQ 6-disc remained available, the early-MyGIG REN gave way to the RBZ MyGIG, and the Alpine REC navigation unit was still on the order sheet for some configurations.
- Base AM/FM/CD - Media Center 130 (sales code RES) - Entry-level single-CD receiver carried over from 2008. Small non-touchscreen monochrome display with hard buttons and MP3/WMA support, optional Sirius (RSC). No Bluetooth, no touchscreen, no navigation.
- AM/FM with In-Dash 6-Disc CD/MP3 (sales code RAQ) - Optional six-disc in-dash CD changer with MP3/WMA support and chrome-ringed knobs. Same display family as the RES, distinguished by the 6-disc magazine slot front and centre.
- MyGIG Media Center 430 (sales code RBZ) - The 2010 model year is the documented transition where RBZ replaced the REN, with Bluetooth Uconnect and SiriusXM more consistently available on these units. 6.5-inch colour touchscreen, internal hard drive, USB, and CD/DVD slot. No on-board Garmin navigation tile - that distinction belongs to the navigation-equipped MyGIG variants found on other Mopar models.
- REC Navigation Radio (sales code REC) - Alpine-built 5.8-inch colour-screen nav radio with an 8-way joystick controller, satin-silver bezel, integrated 6-disc CD changer, and GPS guidance. Still available as a factory option on 2010 Commanders alongside the new RBZ MyGIG.
Tip: small non-touch display with one CD slot = RES; same display with a 6-disc magazine slot = RAQ; 6.5-inch touchscreen with no Nav tile = RBZ MyGIG; 5.8-inch colour screen with a side-mounted joystick and satin-silver bezel = REC.
Access Your S/N on the Radio Screen
Try the following for your 2010 Jeep Commander:
The 2010 Jeep Commander could feature the MyGIG RER 730N (navigation) or REP 430 (without nav) radio, or the older RES 130 standard unit. These radios do not support on-screen serial number retrieval.
The serial can only be found by physically removing the radio. The label is on the back, side, or top of the head unit.
Access the S/N by Pulling Out the Radio Unit
If the serial number cannot be accessed via display, use the pull-out method.
Most Jeep Commander factory radios include a label with the serial number printed on the casing.
Steps:
- Switch off the vehicle.
- Lift the dashboard frame surrounding the radio.
- Release the mounting bolts.
- Slide the unit forward to access the label.
The serial number is usually located near the printed code.
To extract the radio from the 2010 Commander:
- Turn off the vehicle.
- Remove the dashboard trim. The Commander's trim has robust clips – begin from the bottom and work around.
- Remove the 4 mounting bolts (Phillips).
- Slide the radio out to view the serial label.
The Commander shares its radio platform with the same-era Grand Cherokee, so the removal process is very similar.
Commander's Hardware Label Method
- Why removal is the trustworthy method. On the 2010 Commander (XK, final model year), the radio serial number is printed on a manufacturer label on the chassis itself. Pulling the unit and reading the label is the reliable way to capture the exact 14-character string - regardless of whether the car has the base RES, the RAQ 6-disc, the new-for-2010 RBZ MyGIG, or the Alpine REC navigation unit.
- Safety first. Turn the ignition fully off and remove the key. Disconnect the negative battery terminal and wait several minutes for SRS / airbag capacitors to discharge before working in the dash. Avoid yellow airbag wiring and release every connector by its locking tab rather than tugging.
- Tools to have on hand. Plastic pry/trim tools (or a tape-wrapped flat-blade screwdriver), a small Allen/hex key for the bezel perimeter screws, a #2 Phillips screwdriver for the four radio chassis screws, a small parts tray, and a soft cloth to lay across the steering column.
- Free the dash bezel. The XK Commander's radio bezel is retained by a series of perimeter screws (typically Allen/hex - Commander threads commonly cite around 16 perimeter screws) plus a few snap clips. Remove the visible screws first, then begin at one corner with a panel tool and work the bezel outward in small steps until each clip releases. Recover any clips that stay behind in the dash holes and re-seat them on the bezel.
- Unplug bezel-mounted switches. Tilt the loose bezel toward you and disconnect any harnesses attached to it, then set the bezel aside on a soft surface so the textured face is not scuffed.
- Remove the four radio mounting screws. The radio is secured to the dash sub-frame by four Phillips-head screws (typically one near each corner of the cage). Remove all four and keep them together so they are not mixed with the bezel hardware.
- Slide the radio out and disconnect. Pull the unit straight forward out of its opening, then release the locking antenna connector and unplug the multi-pin electrical harness(es) at the back of the unit.
- Locate the S/N label. Look on the top, side, and rear of the chassis for the manufacturer sticker (white or silver) showing a 14-character serial number commonly starting with
T, accompanied by a Chrysler/Mopar part number and barcode. Photograph it for clarity. - Reinstallation tips. Reconnect harnesses before sliding the unit back in; route the antenna cable so it does not get pinched; tighten the four screws snug but not over-torqued; align the bezel and press around its perimeter until each clip seats, then re-fit the bezel screws.
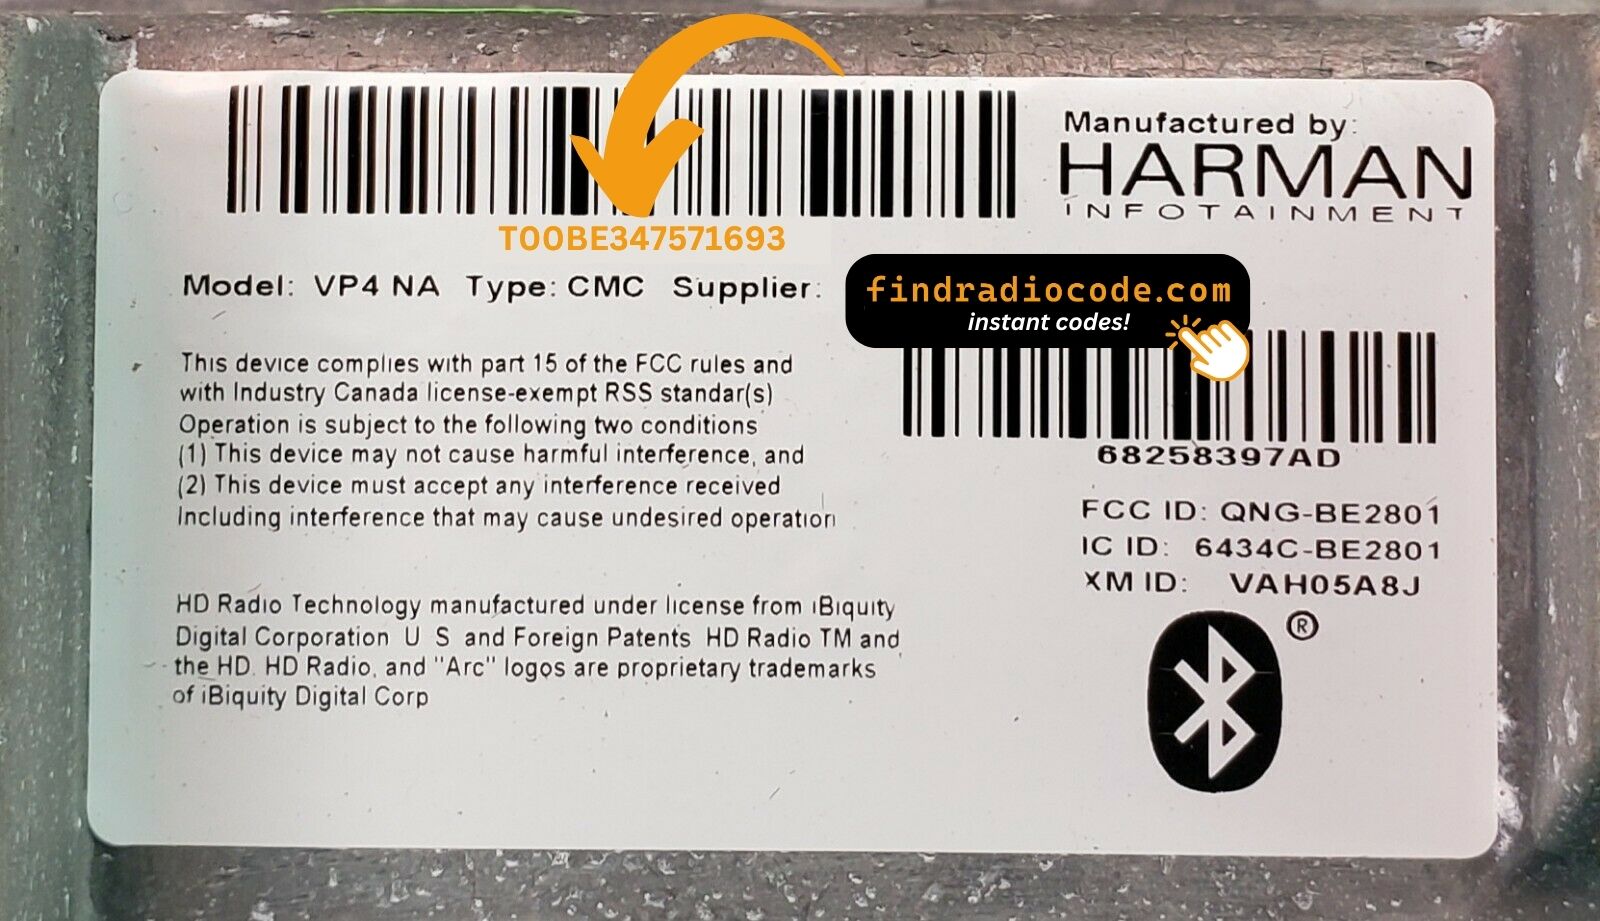
Example: Jeep Commander serial number label location
Typical Radio Serial Prefixes and Formats
Common radios in the 2010 Commander:
- MyGIG RER 730N (nav) – prefix:
TM9 - MyGIG REP 430 (standard) – prefix:
TM9 - RES 130 (base) – prefix:
TM9orT00AM
Serial numbers are 14 characters. The Commander was last produced in 2010.
What a Valid Serial Number Looks Like
Serial numbers on the 2010 Commander's factory radios are typically 14 characters long and commonly begin with the letter T, printed on the chassis label together with a Chrysler/Mopar part number. The exact prefix usually depends on which sales-code radio is installed, and prefixes can vary slightly between production runs and supplier batches.
RES (Media Center 130 base CD)
- Typically a 14-character alphanumeric string commonly beginning with
T, followed by a family identifier and a production sequence printed on the chassis label. Ignore anyS/NorSERprefix, dashes, spaces, or barcode on the label - the value to submit is the contiguous 14-character alphanumeric serial.
RAQ (6-Disc CD/MP3)
- Typically a 14-character alphanumeric string commonly beginning with
T, found on the Mopar-supplied chassis label of the in-dash 6-disc unit.
RBZ (MyGIG Media Center 430)
- Commonly begins with
T00-style prefixes such asT00AMorT00BE, followed by alphanumeric/numeric digits to make up the 14-character total. These Mitsubishi-built MyGIG units are the typical 2010 MyGIG factory option once RBZ replaced the REN.
REC (Alpine 5.8-inch Navigation)
- Typically a 14-character alphanumeric serial commonly beginning with
T, found on the Alpine-built nav unit's chassis label alongside a Mopar part number. Code-lookup catalogues for Jeep Commander referenceT-prefix patterns for the REC family.
Important caveat: capitalisation matters, and prefixes and exact patterns can vary between production runs and supplier batches, so always verify the value as printed on the label rather than assuming a fixed prefix from another car.
Step-by-Step Jeep Commander 2010 Radio Code Retrieval Guide
To get the code, you'll take only 4 easy steps.
- Find the radio's serial - this is the only info required by our side.
The difference with the dealership lookup is that no VIN is needed. - Enter the serial number into our generator above.
Our system checks it against a database of supported radios and automatically retrieves the matching security code. - In most cases, the code appears instantly on the screen after payment and is also sent to your email , just in case.
If we need to check it manually, you'll be informed before checkout. - When you receive it, just enter it into the radio to restore full functionality.
How Code Entry Works on Your Jeep Radio
After locating the serial number and received the unlock code, the next part is entering it into your radio.
Jeep original head units display a locked screen when ready for input.
The process is usually straightforward, but button layouts and confirmation methods may change depending on the radio version installed in your Commander.
Step-by-Step - The Correct Way to Enter It
To input the code on the 2010 Commander's radio:
- Ignition ON. Radio shows "CODE".
- Touchscreen (MyGIG): Use the touchscreen.
- Non-touchscreen (RES): Cycle preset buttons 1-4 for each digit, then hold Enter/OK.
Lockout: Several wrong entries = lockout. Keep radio powered for about 60 minutes to clear.
Step-by-Step Code Input Guide
- Limited Attempt Warning (read first). Mopar Commander radios of this era - including the RBZ MyGIG that replaced the REN for 2010 - typically allow up to three attempts to enter a valid 4-digit anti-theft code. After three successive invalid entries the radio enters a long WAIT (LOCK) state - the display generally reads
WAIT, and the recovery is to leave the ignition in RUN with the radio powered for a continuous extended period (commonly documented at around 30 minutes), after which theCODEprompt returns. Do not cycle power during the wait - it generally resets the timer. - Power up. Turn the ignition to RUN (or ACC) and wait for the radio to finish booting and display
CODEorENTER CODE. - Entry on the RES and RAQ preset-button radios. With the display showing
CODE, use the station preset buttons (typically 1-4) to dial each of the four digits in order. On many Mopar units of this era, preset 1 increments the first digit, preset 2 the second, and so on - press the appropriate preset the right number of times to land on each digit. After all four digits show, press the labelled enter/OK button to submit. - Entry on the RBZ MyGIG (Media Center 430) touchscreen. Use the on-screen numeric keypad to tap each of the four digits of your code in sequence. Once the fourth digit is shown, an
OK/GObutton becomes active on screen. Tap it to submit; a correct code clears the prompt and the radio resumes normal operation. - Entry on the REC navigation radio. Use the joystick / on-screen menu controls to navigate to the code-entry prompt, then dial each of the four digits in turn and confirm with the OK / Enter selection. The display returns to normal operation when the code is accepted.
- If the code is rejected. Stop after the second failed attempt, double-check the code against your paperwork, and start a fresh entry from the first digit on the next attempt. Never burn the third attempt on a guess - it is far cheaper to wait out the cooldown than to risk further escalations.
- Tip. Tap each digit deliberately - rapid double-taps on the MyGIG touchscreen can register an extra digit and inadvertently submit an incorrect entry.
Why Did the Radio Lock and Ask for a Code?
This Jeep sees radio lockouts primarily because of:
- Battery age and failure — Vehicles this old frequently need battery replacements, and each replacement locks the radio.
- Battery disconnect during service — oil changes, alternator work, or other service that involves a battery disconnect also activates the lock.
- Blown fuse — a blown radio fuse interrupts the radio supply, triggering the anti-theft.
- Used vehicle purchase — Commander vehicles are old and the original code documentation is frequently lost.
The unlock code is permanently linked to the radio serial number and remains valid.
Understanding Unlock Issues with Your Commander
When no code prompt appears after reconnecting the battery:
- Make sure the ignition is in the ON position and give a moment for the radio to boot.
- Check the fuse box — a blown fuse prevents any display from activating.
- On some Commander units, pressing the power button on the radio front panel can wake the code prompt.
Commanders from this era are susceptible to aging fuse connections which mimic a dead radio.
As these older units lack on-screen serial retrieval, the radio must be physically removed to find the label. On the label, identify:
- Serial number — 14 alphanumeric characters, starting with
TM9orT00AM. Use this one. - Part number — typically
P05064...or68.... Do not submit this.
Commander labels can be worn or faded, good lighting helps and take a photo before reinstalling the unit to avoid removing it twice.
Code failure on the Commander's radio comes down to the wrong serial was submitted. These older Jeep radios carry both a serial number (prefix TM9 or T00AM, 14 characters) and a part number (P05064... or 68...) on the label. Only the serial produces the unlock code.
Should the code not work, go back and check the serial on the physical sticker. Reach out for a free re-check if needed.
After 3 failed entries on the Commander's radio trigger a lockout of approximately 60 minutes. The display shows "WAIT" or goes silent. To handle the lockout:
- Leave the ignition ON for the full 60 minutes.
- Cycling the ignition restarts the wait from scratch.
This behavior is consistent across all radio models fitted to the Commander. After 60 minutes, try again carefully.
The button method on the Commander varies by radio type:
- MyGIG 730N / REP 430 (touchscreen) — Tap each digit on the touchscreen keypad. No hold-confirm.
- RES 130 (non-touchscreen) — Press preset button 1 cycling to select the first digit. Repeat with buttons 2, 3, 4 for subsequent digits. Hold Enter/OK to submit.
If you are unsure which radio you have, check the face of the radio — a touchscreen means MyGIG; a black LCD means preset button entry.