
Radio Units Used in the 2020 Dodge Journey
These head units were fitted to the 2020 Dodge Journey. Open the one that matches your dash to see how to identify it and how the code is retrieved.
| Years | Factory radio | Serial starts with |
|---|---|---|
| 2017-2021 | Uconnect 7.0 UAG UCG VP2RFP Continental |
TQN, TVPQN, A2C, A3C
|
Steps to Unlock Your 2020 Dodge Journey Radio
Vehicle radios use anti-theft codes dependent on the radio unit itself rather than the model or production year.
- The generator identifies your Dodge radio via serial-based verification.
- When you input the serial into the generator, the system identifies the radio unit and generates the code that you need.
- You can then enter the code directly into your Dodge radio.
- The online process is quicker and more accessible than visiting the Dodge dealer.
How to Enter the Radio Code
After receiving 2020 Dodge Journey unlock code from the serial, you're ready to reactivate the radio.
Some drivers get stuck at this stage because input methods can look different across radio versions, but it's usually simple.
When the radio shows CODE, it means the unit is waiting for the correct numbers.
Detailed Input Instructions for Journey 2020
Entering the code on the 2020 Journey's Uconnect 8.4":
- Ignition ON. Screen shows "ENTER CODE" or ----.
- Use the touchscreen on the Journey's 8.4" screen to enter your 4-digit code.
- The radio auto-unlocks after the 4th digit — no confirm required.
Lockout: 3 wrong attempts = 60-minute lockout. Keep ignition ON throughout. Turning off the ignition restarts the wait.
Detailed Input Instructions for Journey 2020
Once the unlock code has been retrieved for a 2020 Journey radio, it can be entered straight at the head unit - no scan tool or dealer visit is required.
- Limited attempts: after three successive incorrect codes the radio drops into a
WAITlockout state, so verify each digit before pressing it. - Place the ignition in RUN/ACC so the radio powers up while the engine stays off.
- Wait for the display to show
CODE,Please Enter Anti-Theft Code, or a similar prompt. - On the Uconnect 8.4 (RE2) and 8.4N (RB5) units, key the four digits using the on-screen number pad and confirm with the on-screen OK/Enter button.
- On the base Radio 4.3 / Uconnect 4.3 unit, press the numbered preset buttons (1-6) in sequence and confirm with the tune/menu knob or labelled enter button as prompted on the display.
- If
WAITappears after three failed attempts, leave the radio powered with the ignition in RUN for a continuous 30 minutes (the vehicle may be driven during this time) before trying the correct code again.
Finding the Radio S/N for Dodge
The initial step is to find and write down the radio's serial num.
Based on the head unit type installed in your 2020 Journey, the serial can be found either through the display menu or by pulling the unit out and checking the label on the radio itself.
Below are the most common methods to identify your S/N quickly.
2020 Journey - Which Radio Did You Get?
2020 was the final model year for the Journey and the radio lineup ended exactly where it had started in 2011 - on the Uconnect 3 (3C) generation, with no migration to the newer Uconnect 4/4C platform that brought Apple CarPlay and Android Auto to other FCA models.
- Radio 4.3 (Uconnect 4.3) - the standard head unit on SE/SE Value: 4.3-inch colour display, AM/FM/CD, hard preset buttons. The upgraded Uconnect Touch 4.3S adds touch response and SiriusXM and was offered on Crossroad.
- Uconnect 8.4 (sales code RE2) - 8.4-inch Continental-built colour touchscreen without navigation, glossy bezel, on-screen home menu with no NAV soft key. Available on higher trims and as a package option.
- Uconnect 8.4N (sales code RB5) - the same 8.4-inch hardware as the RE2 but with Garmin-based navigation, HD Radio and SiriusXM Travel Link enabled. Identifiable by the NAV soft key on the home menu and the Garmin logo at boot. The rarer of the two 8.4 units.
Fast Serial Lookup Using Radio Controls
These are the steps you need to follow for 2020 Dodge Journey:
The 2020 Dodge Journey serves as a practical family vehicle and comes with the Uconnect 8.4" (RA3) infotainment system. Retrieving the serial number is done via Dealer Mode.
Climate Button Method:
- Turn the ignition to ACC or ON.
- On the Journey's center stack, locate the Climate Up, Climate Down, and Front Defrost buttons below the 8.4" screen. Press and hold all three at the same time for 5 seconds.
- Dealer Mode loads on the screen.
- Select: System Info → Radio Part Info → Serial Number.
Backup Method: Hold Temperature Up (red) and Temperature Down (blue) for 5 seconds to enter Engineering Mode, then follow the same path.
Fast Serial Lookup Using Radio Controls
If your 2020 Journey is fitted with the Uconnect 8.4 (RE2) or 8.4N (RB5), the radio serial number can usually be read on screen via FCA's factory dealer/diagnostic mode without taking anything apart. The base Radio 4.3 / Uconnect 4.3 does not expose this information through its display, so for that head unit the serial has to be read from the chassis label after the unit is removed.
- Place the ignition in RUN/ACC so the radio powers up but the engine stays off.
- Wait for the Uconnect home screen to finish loading.
- On the climate panel below the screen, press and hold the driver-side temperature UP, the driver-side temperature DOWN, and the front DEFROST button at the same time for roughly 7 seconds.
- The screen switches to a diagnostic/dealer menu listing radio information, software revisions and serial numbers.
- Read the radio serial number entry exactly as printed and double-check ambiguous characters such as 0/O and 1/I before transcribing it.
- Switch the ignition off to exit; the head unit returns to normal on the next start.
If the three-button combination has no effect, the radio is the base 4.3 and the serial will need to come from the printed chassis label instead.
Serial Number on the Unit
If the serial does not appear on screen, the next step is checking the radio itself.
Many Dodge radios require physical access to the ID label attached to the unit.
Common approach:
- Start by completely shutting off the engine - pull the key out.
- Then detach the trim panel.
- Next, unscrew the mounting points and slide the radio forward.
- Look for a printed tag showing the serial number.
If Dealer Mode is not accessible on your 2020 Journey, the radio can be physically removed to find the serial label. The Journey's compact center stack is relatively easy to work on:
- Remove the center trim bezel – The Journey's trim panel covers the radio and climate section. Use a trim tool at the lower edge and gently pry along the perimeter to pop off the friction clips.
- Remove the 4 mounting screws – Phillips or Torx T20 screws at the radio frame corners.
- Pull the radio forward – Ease the unit out far enough to view the serial label on the top or side.
The serial is a 14-character barcode label. Wiring can stay plugged in.
Pulling Out the Radio Unit to See the S/N on the Tag
For 2020 Journeys with the base Radio 4.3 / Uconnect 4.3, or if the dealer-mode shortcut does not work on the 8.4 unit, the head unit has to come out so the printed serial label on the chassis can be read.
- Safety first: turn the ignition off, remove the key, disconnect the negative battery terminal, and wait several minutes before touching wiring; never disturb the yellow airbag/SRS connectors and use plastic trim tools so nothing shorts or breaks.
- Tools you will need: plastic trim removal kit, Phillips screwdriver, small Torx bit set, flashlight, and a 7 mm socket on hand for any deeper retaining bolts.
- Start at the lower edge of the centre dash bezel and ease it forward with a plastic pry tool, working up the sides; the bezel is held in by spring/friction clips with no visible screws on its face.
- Once the clips release, tilt the bezel out and unplug the connector for the hazard switch and any HVAC/auxiliary plugs on the back of the panel before lifting it clear.
- Set the bezel aside on a soft cloth so the gloss finish does not get scratched.
- Remove the screws (typically four) securing the radio chassis to the dash bracket.
- Slide the radio forward and disconnect the antenna lead and the multi-pin power/data harnesses on the rear of the unit.
- The serial number is printed on a barcode/sticker label on the top or side of the radio chassis, alongside the part number and Mopar/supplier markings.
- Photograph the label up close and double-check ambiguous characters such as 0/O and 1/I before submitting the serial.
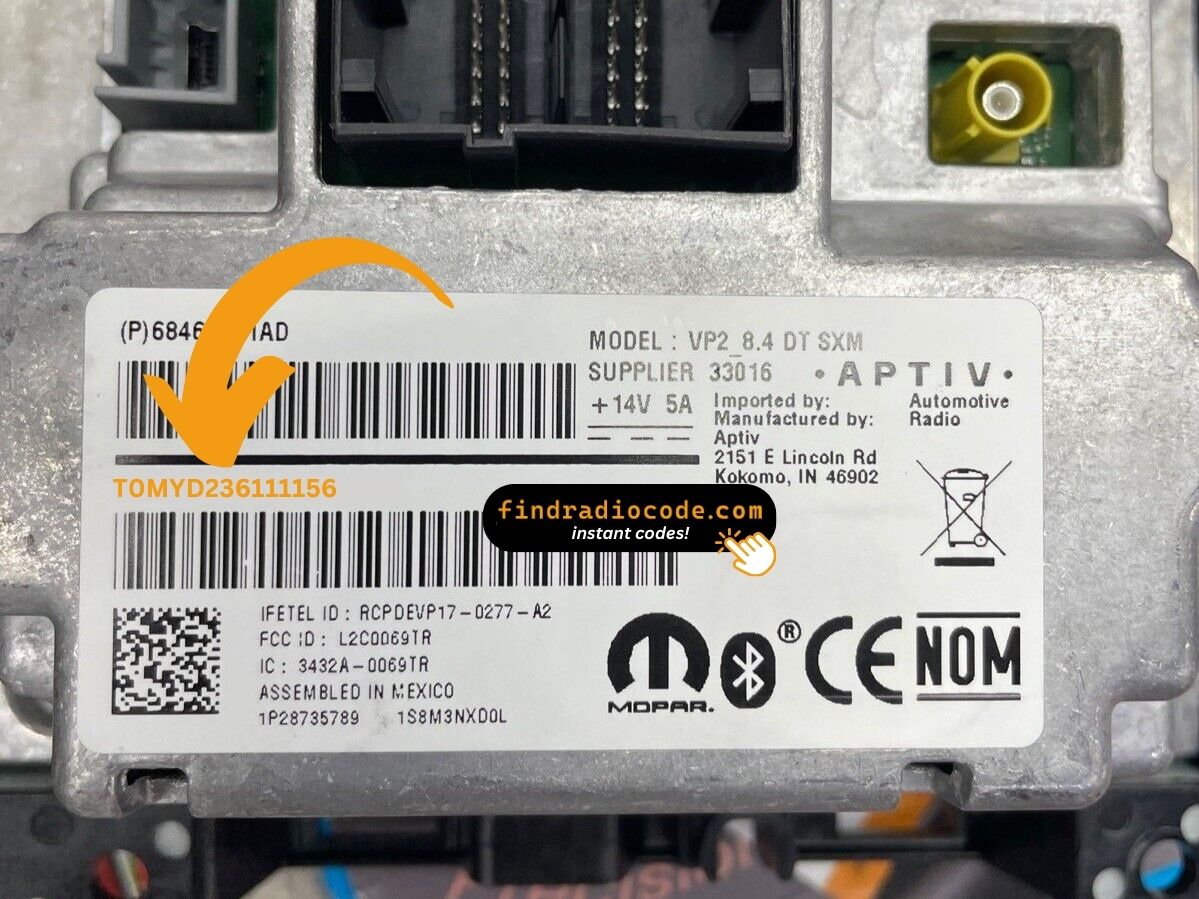
Example: Dodge Journey serial number label location
Serial Number Format Guide for 2020 Dodge Journey
The 2020 Dodge Journey with the 8.4" Uconnect (RA3) features these serial formats:
T00AM– Harman VP2 Uconnect (most common format)T00BE– Continental buildTM9– Earlier Harman production
Radio designation: RA3. Serial length: 14 characters. Note: The Journey kept the classic RA3 system through 2020 — even the final production years.
Reminder The Journey's label also shows a part number (P05064... or 68...) — only the serial is used for code generation.
Typical Serial Number Formats for 2020 Journey Radios
The prefix printed on the chassis label varies with which head unit was specified and which supplier built it.
Uconnect 8.4 (RE2) and 8.4N (RB5)
- These Continental-built 8.4-inch head units typically print an alphanumeric serial on the case sticker.
- Common Mopar Uconnect 8.4 prefixes from this generation begin with the letter
Tfollowed by additional letters and digits. - The serial usually runs as a continuous block of characters with no dashes or spaces.
Radio 4.3 / Uconnect 4.3 (Touch 4.3S)
- The base 4.3 head unit usually carries a Mopar-style serial on a chassis sticker.
- Treat the printed label on the unit itself as the authoritative reference and copy each character exactly.
Troubleshooting Common Radio Problems - Journey 2020
The Journey's Uconnect 8.4" uses touchscreen-only input for code entry — no hardware keys are used. When the code screen appears:
- Press each number directly on the 8.4" touchscreen.
- The radio auto-unlocks after the final number — no confirm step is required.
Should taps not register, cycle the ignition and wait 30 seconds.
After three incorrect codes on the Journey's Uconnect, a 60-minute lockout kicks in. The screen displays "WAIT":
- Leave the Journey's ignition ON — engine off is fine but key stays in ON.
- Wait the entire 60 minutes to pass.
- Cycling the key resets the wait.
After the 60 minutes, re-enter the correct code.
On the 2020 Journey, the RA3 radio label contains the serial and the part number:
- Serial number — 14 characters, beginning with
T00AM,T00BE, orTM9. Use this. - Part number — starts with
P05064or68. Not used.
For this model, Dealer Mode is easiest way: System Info → Radio Part Info → Serial Number. No removal needed.
A rejected code on the Journey's Uconnect 8.4" is usually caused by a serial mismatch. The RA3 label has a serial number (14 alphanumeric characters, starts with T00AM, T00BE, or TM9) and a part number (P... or 68...) on the same sticker.
Double-check the number via Dealer Mode or the physical label and reach out for a free re-check if needed.
When no code prompt shows after a battery event:
- Ensure ignition is in ON (not ACC) and give it a moment for the system to fully start.
- Inspect the radio fuse — a blown fuse will stop the display from activating.
- On some Journey units may require a brief button press to trigger the code prompt.
Should nothing appear, a blown fuse is the most common cause.
What Caused the Radio to Lock?
Journey owners encounter this typically due to:
- Battery replacement — as a popular daily family vehicle means batteries get replaced regularly, and each replacement triggers the lock.
- Dead battery from short trips — vehicles driven on frequent short trips can develop weak batteries, eventually causing a dead battery and locking the radio.
- Blown fuse — fuse replacement counts as a power cut and locks the radio.
- Used purchase — the Journey was a popular family used buy without the original unlock code means the code is needed immediately.
The unlock code is permanently tied to the serial number and remains valid.