
2018 Dodge Journey Head Units and Their Makers
Not sure which radio you have? Match your screen and faceplate with the 2018 Dodge Journey radios below. Each guide lists the serial prefixes and identification tips.
| Years | Factory radio | Serial starts with |
|---|---|---|
| 2013-2018 | Chrysler Uconnect 8.4 Panasonic |
TM9
|
| 2013-2018 | Uconnect 3.0 RA1 VP1 Continental |
TQN, TVPQN, A2C, A3C
|
| 2013-2018 | Uconnect 8.4 RA3 VP3 CA Harman |
T00AM, T00BE, T0012
|
| 2013-2018 | Uconnect 8.4 RA3 VP3 MX Harman |
T00AM, T00BE, T0012
|
| 2013-2018 | Uconnect 8.4 RA3 VP3 NA Harman |
T00AM, T00BE, T0012
|
| 2014-2018 | Uconnect 5.0 RA2 VP2 Continental |
TQN, TVPQN, A2C, A3C
|
| 2014-2018 | Uconnect 8.4 RA4 VP4 NA Harman |
T00AM, T00BE, T0012
|
| 2017-2021 | Uconnect 7.0 UAG UCG VP2RFP Continental |
TQN, TVPQN, A2C, A3C
|
Why Did the Radio Lock and Ask for a Code?
Owners of this family crossover encounter this most commonly because of:
- Battery replacement — as a popular daily family vehicle means batteries get replaced regularly, and each replacement activates the code screen.
- Dead battery from short trips — vehicles driven on frequent short trips may not charge fully, eventually causing a dead battery and locking the radio.
- Blown fuse — fuse replacement also interrupts power and locks the radio.
- Used purchase — buying second-hand without the original unlock code means the code is needed immediately.
The unlock code is permanently tied to the serial number and remains valid.
Understanding the Radio Serial Number and How to Locate It on 2018 Journey
The starting step is locating the radio serial.
Many drivers assume the code depends on the Dodge model or year, but actually, the unlock process depends on the unique radio unit's serial number.
The serial is the key used to calculate the correct unlock code.
This is actually better, because if you have bought a used radio, the VIN or other Dodge-specific data wouldn't be of much use.
Based on the radio used, you can see the serial directly from the display or by looking at the label on the radio chassis.
Which Head Unit Is in Your 2018 Journey?
For 2018 the Journey kept the same Uconnect 3 (3C) generation lineup. A 2018 GT thread on DodgeJourneyForum even has owners noting their 8.4 still does not have Apple CarPlay or navigation - confirming the Journey never moved to the newer 4C platform with phone projection.
- Radio 4.3 (Uconnect 4.3) - the standard head unit on SE/AVP. 4.3-inch colour display, AM/FM/CD, hard preset buttons. The upgraded Uconnect Touch 4.3S adds touch response and SiriusXM on SXT/Crossroad.
- Uconnect 8.4 (sales code RE2) - 8.4-inch Continental-built colour touchscreen, no navigation. Glossy bezel, on-screen home menu without a NAV soft key. Available on SXT/Crossroad/GT.
- Uconnect 8.4N (sales code RB5) - the same 8.4-inch hardware as the RE2 but with Garmin-based navigation, HD Radio and SiriusXM Travel Link. Identified by the NAV soft key on the home menu and the Garmin boot logo. The rarer of the two 8.4 units.
View the S/N on the Radio Screen
Try the following for your 2018 Dodge Journey:
The 2018 Dodge Journey is a compact family crossover and features the Uconnect 8.4" (RA3) infotainment system. Retrieving the serial number is done via Dealer Mode.
Climate Button Method:
- Turn the ignition to ACC or ON.
- On the Journey's center stack, locate the Climate Up, Climate Down, and Front Defrost buttons positioned beneath the display. Press and hold all three simultaneously for 5 seconds.
- Dealer Mode opens on the screen.
- Navigate to: System Info → Radio Part Info → Serial Number.
Backup Method: Hold Temperature Up (red) and Temperature Down (blue) for 5 seconds to open Engineering Mode, then navigate to the same menu.
Before Removing the Radio, Try This Screen Method
If your 2018 Journey is fitted with the Uconnect 8.4 (RE2) or 8.4N (RB5), the radio serial number can usually be read on screen using FCA's factory dealer/diagnostic mode - no removal needed. The base Radio 4.3 / Uconnect 4.3 does not expose this information through its display, so for that head unit the serial has to be read from the chassis label after removal.
- Turn the ignition to RUN/ACC so the radio powers up but the engine stays off.
- Wait for the Uconnect home screen to finish loading.
- On the climate panel below the screen, press and hold the driver-side temperature UP, the driver-side temperature DOWN, and the front DEFROST button at the same time for roughly 7 seconds.
- The screen switches to a diagnostic/dealer menu listing radio information, software revisions and serial numbers.
- Locate the radio serial number entry on that screen and write it down exactly as printed, double-checking ambiguous characters such as 0/O and 1/I.
- Switch the ignition off to exit; the head unit returns to normal on the next start.
If the three-button combination has no effect, the radio is most likely the base 4.3 and the serial will need to come from the printed chassis label instead.
Access the Serial by Pulling Out the Unit
If the serial number cannot be accessed on-screen, use the pull-out method.
Most Dodge Journey factory radios include a tag with the serial number printed on the housing.
Step-by-Step:
- Power down the vehicle.
- Lift the trim surrounding the radio.
- Release the fasteners.
- Slide the unit slightly out to access the label.
The serial number is usually located near the printed code.
If Dealer Mode is not accessible on your 2018 Journey, the radio can be physically removed to find the serial label. The Journey's compact center stack is relatively easy to work on:
- Remove the center trim bezel – The Journey's trim bezel surrounds the radio and climate section. Insert a plastic pry tool at the bottom corners and work around the perimeter to pop off the friction clips.
- Remove the 4 mounting screws – Phillips or Torx T20 screws at the radio frame corners.
- Pull the radio forward – Slide the unit out far enough to read the serial label on the side surface.
The serial is a 14-character barcode label. Wiring can remain connected.
Journey's Hardware Label Method
For 2018 Journeys with the base Radio 4.3 / Uconnect 4.3, or if the dealer-mode shortcut does not bring up the diagnostic screen on the 8.4 unit, the head unit needs to come out so the printed chassis label can be read.
- Safety first: turn the ignition off, remove the key, disconnect the negative battery terminal, and wait several minutes; never disturb the yellow airbag/SRS connectors and use plastic trim tools to keep clips and metal contacts intact.
- Tools you will need: plastic trim removal kit, Phillips screwdriver, small Torx bit set, flashlight, and a 7 mm socket on hand for any deeper retaining bolts.
- Start at the lower edge of the centre dash bezel and ease it forward with a plastic pry tool, working up the sides; the bezel is held in by spring/friction clips with no visible screws on its face.
- Once the clips release, tilt the bezel out and unplug the connector for the hazard switch and any HVAC/auxiliary plugs on the back of the panel before lifting it clear.
- Set the bezel aside on a soft cloth so the gloss finish does not get scratched.
- Remove the screws (typically four) securing the radio chassis to the dash bracket.
- Slide the radio forward and disconnect the antenna lead and the multi-pin power/data harnesses on the rear of the unit.
- The serial number is printed on a barcode/sticker label on the top or side of the radio chassis, alongside the part number and Mopar/supplier markings.
- Photograph the label and double-check ambiguous characters such as 0/O and 1/I before submitting the serial.
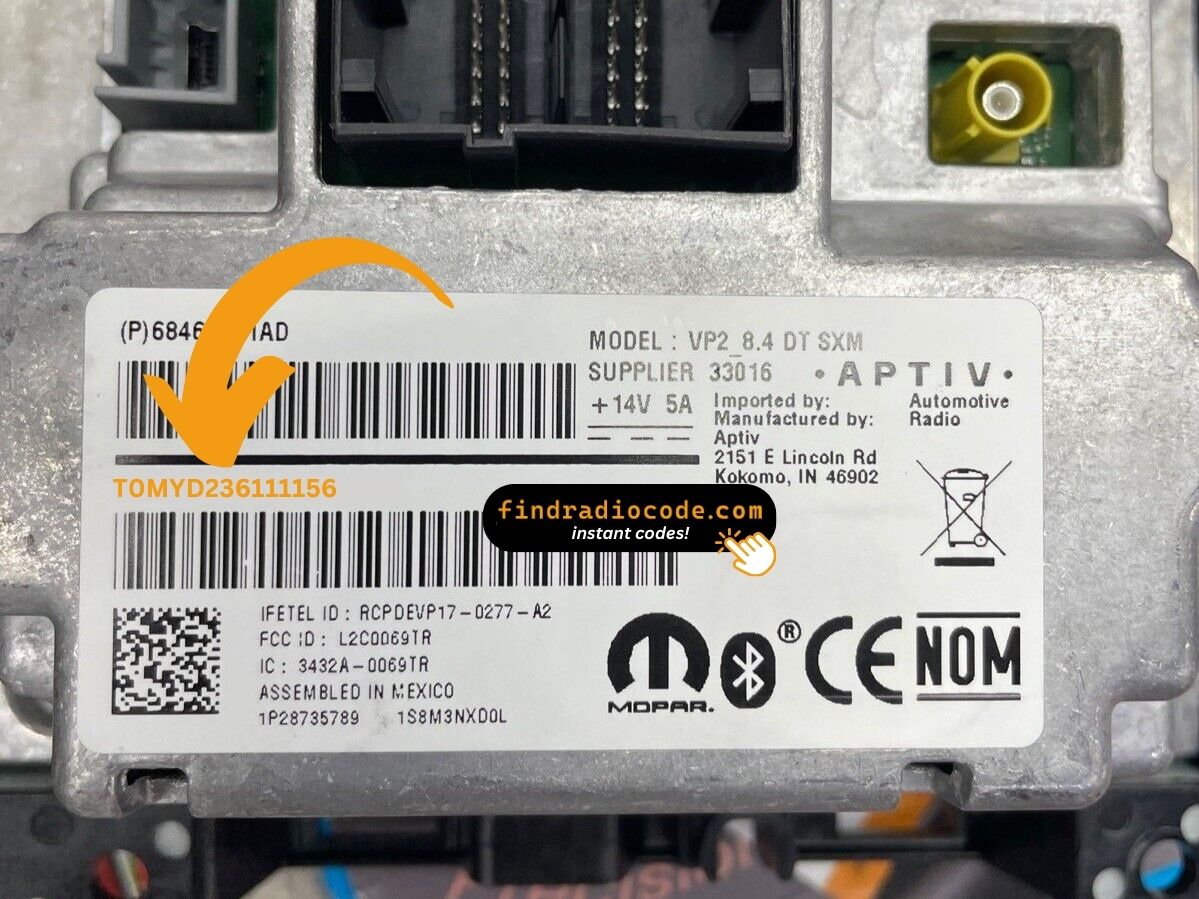
Example: Dodge Journey serial number label location
Serial Number Format Guide for 2018 Dodge Journey
The 2018 Dodge Journey with the 8.4" Uconnect (RA3) uses these serial formats:
T00AM– Harman VP2 Uconnect (standard format)T00BE– Continental buildTM9– Older Harman production
Radio designation: RA3. Serial length: 14 characters. Note: The Journey kept the classic RA3 system through 2020 — even the final production years.
Reminder The Journey's label includes a part number (P05064... or 68...) — only the serial is used for code generation.
S/N Patterns and Prefixes
The prefix printed on the chassis label depends on which head unit was specified and which supplier built it.
Uconnect 8.4 (RE2) and 8.4N (RB5)
- These Continental-built 8.4-inch units typically print an alphanumeric serial on the case sticker.
- Common Mopar Uconnect 8.4 prefixes from this generation begin with the letter
Tfollowed by additional letters and digits. - The serial usually runs as a continuous block of characters with no dashes or spaces.
Radio 4.3 / Uconnect 4.3 (Touch 4.3S)
- The base 4.3 head unit usually carries a Mopar-style serial on a chassis sticker.
- Treat the printed label on the unit itself as the authoritative reference and copy each character exactly.
How 2018 Dodge Journey Radio Code Lookup Works
Getting your radio code takes only 4 easy steps.
- Locate the radio's serial number - this is the only information required by our side.
The difference with the dealership lookup is that no VIN is needed. - When you've found the S/N, type it into the form above.
The system checks it against a database of supported units and automatically retrieves the matching security code. - In most cases, the code appears instantly on the screen after you pay and is also sent to your email , just in case.
If manual verification is required (rare situations), you'll be notified before checkout. - Once you receive the code, simply enter it into your radio to restore full functionality.
Final Step - Enter the Radio Code
When you obtain the correct unlock code based on the S/N, you can restore default functionality by entering it into the unit.
The code entry process depends on the radio interface, but most 2018 Journey systems follow a similar structure using preset buttons, touch controls, or rotary knobs - depending on if it's a factory or an aftermarket unit.
You will typically see SAFE displayed on screen.
Step-by-Step - The Correct Way to Enter It
Code input on the 2018 Journey's Uconnect 8.4":
- Ignition ON. Screen shows "ENTER CODE" or ----.
- Use the touchscreen on the Journey's 8.4" screen to enter your 4-digit code.
- The radio restores after the 4th digit — nothing else needed.
Lockout: 3 wrong attempts = 60-minute lockout. Keep ignition ON throughout. Turning off the ignition resets the timer.
Entering Process
Once the unlock code has been retrieved for a 2018 Journey radio, it can be entered straight at the head unit - no scan tool or dealer visit is required.
- Limited attempts: after three successive incorrect codes the radio drops into a
WAITlockout state, so verify each digit before pressing it. - Place the ignition in RUN/ACC so the radio powers up while the engine stays off.
- Wait for the display to show
CODE,Please Enter Anti-Theft Code, or a similar prompt. - On the Uconnect 8.4 (RE2) and 8.4N (RB5) units, key the four digits using the on-screen number pad and confirm with the on-screen OK/Enter button.
- On the base Radio 4.3 / Uconnect 4.3 unit, press the numbered preset buttons (1-6) in sequence and confirm with the tune/menu knob or labelled enter button as prompted on the display.
- If
WAITappears after three failed attempts, leave the radio powered with the ignition in RUN for a continuous 30 minutes (the vehicle may be driven during this time) before trying the correct code again.
Understanding Unlock Issues with Your Journey
A rejected code on the Journey's Uconnect 8.4" is usually caused by the wrong serial was submitted. The RA3 label displays both a serial number (14 alphanumeric characters, starts with T00AM, T00BE, or TM9) and a part number (P... or 68...) on the same sticker.
Double-check the number via Dealer Mode or the physical label and contact support for a free re-check if needed.
On the 2018 Journey, the RA3 radio label has both the serial and the part number:
- Serial number — 14 characters, beginning with
T00AM,T00BE, orTM9. Use this. - Part number — starts with
P05064or68. Ignore this.
On the Journey, Dealer Mode is the quickest way: System Info → Radio Part Info → Serial Number. No tools required.
The Journey's Uconnect 8.4" uses touchscreen-only input for code entry — no physical buttons are used. Once "ENTER CODE" shows:
- Press each number directly on the 8.4" touchscreen.
- The radio auto-unlocks after the 4th digit — no confirm step is needed.
If the touchscreen doesn't respond, restart by turning the ignition off and on.
When no code prompt shows after a battery event:
- Ensure ignition is in ON (not ACC) and give it a moment for the system to fully start.
- Inspect the radio fuse — a blown fuse prevents the radio from starting.
- Certain models may require a screen tap to trigger the code prompt.
Should nothing appear, power issue is likely the problem.
After three incorrect codes on the Journey's Uconnect, a 60-minute lockout takes effect. The screen shows "WAIT":
- Leave the Journey's ignition ON — the car doesn't need to run but ignition must remain ON.
- Wait the entire 60 minutes to pass.
- Cycling the key resets the wait.
Once clear, try again with the verified code.